SECTION 501-03: Body Closures
| 2014 Flex Workshop Manual
|
REMOVAL AND INSTALLATION
| Procedure revision date: 05/02/2013
|
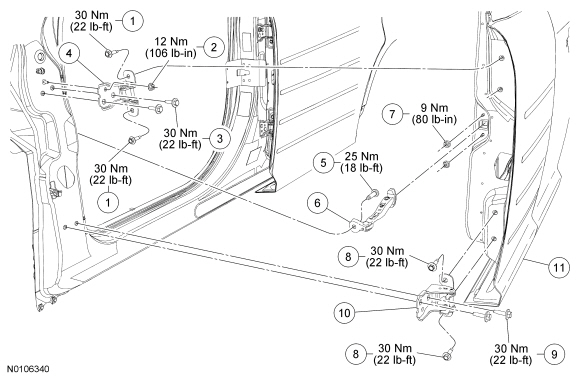
NOTE: Front door shown, rear door similar.

| Item | Part Number | Description |
|---|---|---|
| 1 | W709361 | Front door upper hinge-to-door bolts (2 required) |
| 2 | W709415 | Front door upper hinge-to-body nut |
| 3 | W709361 | Front door upper hinge-to-body bolt (2 required) |
| 4 | 22800 | Front door upper hinge |
| 5 | W709361 | Front door check arm bolt |
| 6 | 23552 | Front door check arm |
| 7 | W712741 | Front door check arm nut (2 required) |
| 8 | W709361 | Front door lower hinge-to-door bolts (2 required) |
| 9 | W709361 | Front door lower hinge-to-body bolt (2 required) |
| 10 | 22810 | Front door lower hinge |
| 11 | 20124 | Front door assembly |
Removal and Installation
NOTICE: To minimize the possibility of cross threading, hand start all fasteners during installation.
NOTICE: To avoid damaging the door, this step requires an assistant.
With a wax pencil, mark the position of each hinge and remove the hinge-to-door bolts.NOTE: If installing a new door, transfer parts as necessary.
To install, reverse the removal procedure.