SECTION 501-35: Body Repairs
| 2014 Flex Workshop Manual
|
DESCRIPTION AND OPERATION
| Procedure revision date: 05/02/2013
|
Body
 WARNING: Collision damage repair must conform to the instructions contained in this workshop manual. Replacement components must be new, genuine Ford Motor Company parts. Recycled, salvaged, aftermarket or reconditioned parts (including body parts, wheels or safety restraint components) are not authorized by Ford.
Departure from the instructions provided in this manual, including alternate repair methods or the use of substitute components, risks compromising crash safety. Failure to follow these instructions may adversely affect structural integrity and crash safety performance, which could result in serious personal injury to vehicle occupants in a crash.
The body consists of the following:
- Radiator support bolster constructed of magnesium
- Optional alpine and moonroof-style roof panels
- High-Strength Low Alloy (HSLA), high-strength and mild steels
- Roof outer panel constructed of mild steel
- Steel hood constructed of dent resistant steel
- Body side outer panels constructed of mild steel
- Dual Phase Steel (DP) in select body structure components
- Bolted, removable front fenders, hinged doors and hood
- Boron and
steel used in A-pillar reinforcement
- Dent resistant steel fenders
- Side Protection and Cabin Enhancement (SPACE®) tube reinforcement on front floor pan
- Steel doors incorporating serviceable outer panels
- Ultra High Strength Steel (UHSS), roll-formed bolt-on front and rear bumper beams
- Front and rear subframe assemblies housing suspension and steering components
- Underbody components constructed of mild, dual-phase and high-strength steels
- Front frame rail sectioning service kit available
- Mastic pads used on floor pan for sound deadening
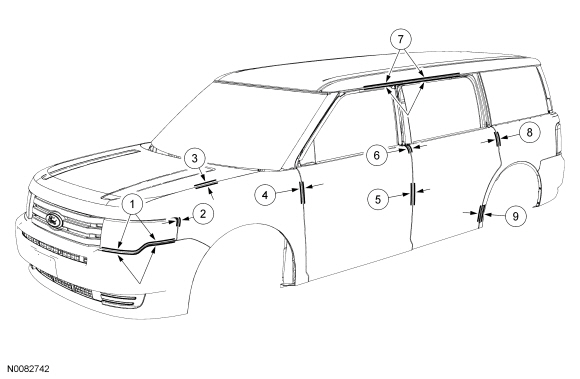
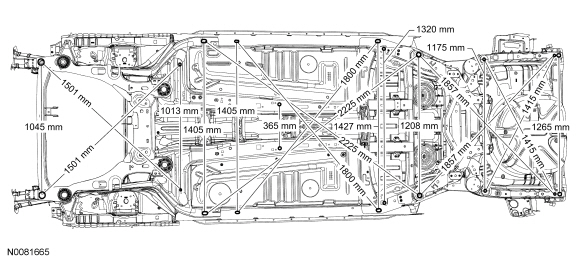
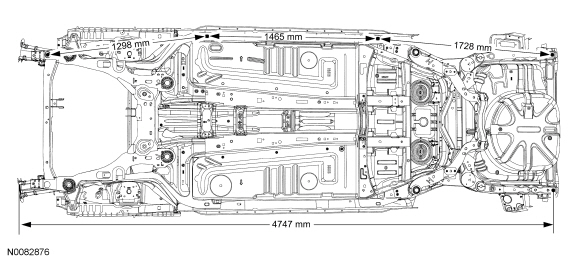
For dimensional information, refer to the following illustrations:
Body Margins
NOTE:
Dimensions apply to the right and left side.

| Item
| Description
| Specification
| Flushness Specification
|
|---|
| 1
| Headlamp to fascia
| 2.5 mm (0.098 in) ± 2.3 mm (0.09 in)
| —
|
| 2
| Headlamp to fender
| 2.3 mm (0.09 in) ± 2.0 mm (0.078 in)
| -1.5 mm (-0.059 in) ± 2.2 mm (0.086 in)
|
| 3
| Fender to hood
| 3.3 mm (0.129 in) ± 1.7 mm (0.066 in)
| —
|
| 4
| Front door to fender
| 4.0 mm (0.157 in) ± 1.1 mm (0.043 in)
| -0.5 mm (-0.019 in) ± 1.5 mm (0.059 in)
|
| 5
| Front door to rear door
| 4.0 mm (0.157 in) ± 1.1 mm (0.043 in)
| 0.0 mm ( in) ± 2.0 mm (0.078 in)
|
| 6
| Front door belt moulding to rear door belt moulding
| 5.0 mm (0.19 in) ± 1.7 mm (0.066 in)
| 0.0 mm ( in) ± 2.0 mm (0.078 in)
|
| 7
| Side door(s) to door opening panel
| 4.7 mm (0.185 in) ± 2.5 mm (0.098 in)
| -4.5 mm (-0.177 in) ± 1.7 mm (0.066 in)
|
| 8
| Rear door to quarter panel
| 3.7 mm (0.145 in) ± 1.1 mm (0.043 in)
| 0.0 mm ( in) ± 1.6 mm (0.062 in)
|
| 9
| Dog leg cladding to body side
| 1.2 mm (0.047 in) ± 0.6 mm (0.023 in)
| 0.0 mm ( in) ± 1.1 mm (0.043 in)
|
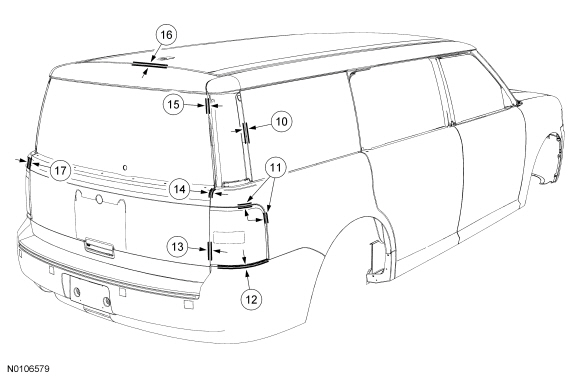
Body Margins

| Item
| Description
| Specification
| Flushness Specification
|
|---|
| 10
| D-pillar applique to body side
| 3.0 mm (0.118 in) ± 3.0 mm (0.118 in)
| 2.0 mm (0.078 in) ± 1.7 mm (0.066 in)
|
| 11
| Tail lamp to body side
| 1.9 mm (0.074 in) ± 1.9 mm (0.074 in)
| -3.7 mm (-0.145 in) ± 2.0 mm (0.078 in)
|
| 12
| Tail lamp to fascia
| 2.4 mm (0.094 in) ± 2.4 mm (0.094 in)
| -2.5 mm (-0.098 in) ± 1.8 mm (0.07 in)
|
| 13
| Tail lamp to liftgate
| 5.2 mm (0.204 in) ± 3.5 mm (0.13 in)
| —
|
| 14
| Lifgate belt moulding to quarter glass belt moulding
| 5.0 mm (0.196 in) ± 2.7 mm (0.106 in)
| 0.5 mm (0.019 in) ± 2.4 mm (0.094 in) ±
|
| 15
| D-pillar applique to liftgate glass
| 5.0 mm (0.196 in) ± 4.0 mm (0.157 in)
| 4.0 mm (0.157 in) ± 2.9 mm (0.114 in)
|
| 16
| Liftgate to steel roof panel
| 7.1 mm (0.279 in) ± 1.7 mm (0.066 in)
| 2.0 mm (0.078 in) ± 1.5 mm (0.059 in)
|
| 17
| Liftgate to quarter panel
| 3.3 mm (0.129 in) ± 1.5 mm (0.059 in)
| 1.6 mm (0.062 in) ± 1.6 mm
|
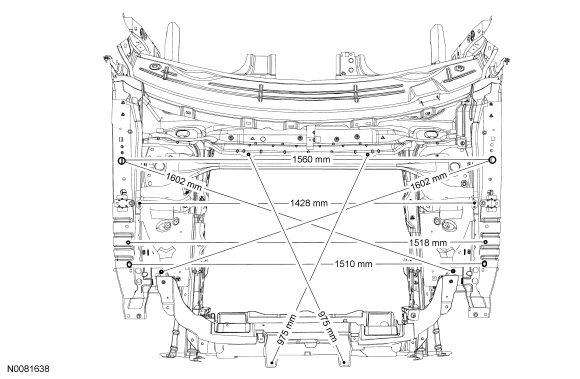
Underhood Dimensions
NOTICE:
The radiator bolster is a magnesium component. If damage occurs to the radiator support component, it should not be repaired or incorrect vehicle operation may result. A new component should be installed. Refer to
Section 303-03
.
NOTE:
Measurements are obtained on center, unless otherwise indicated.

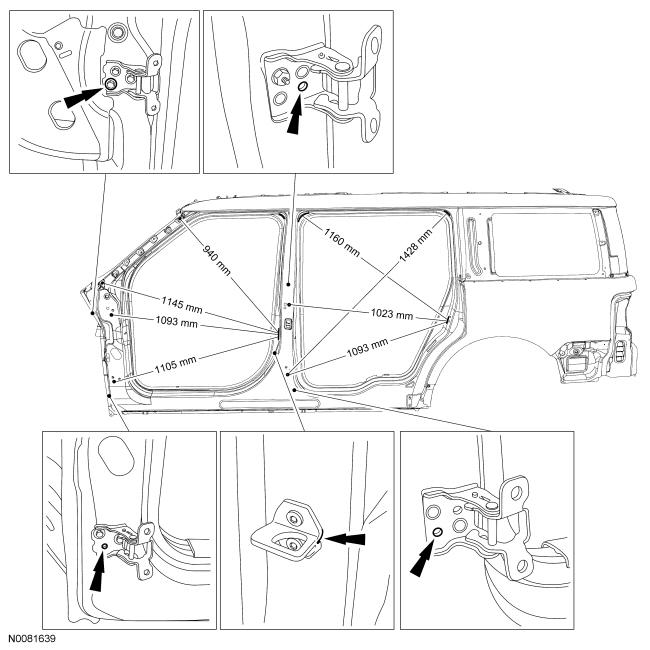
Body Side Closure Dimensions
NOTE:
Measurements are obtained on center, unless otherwise indicated.

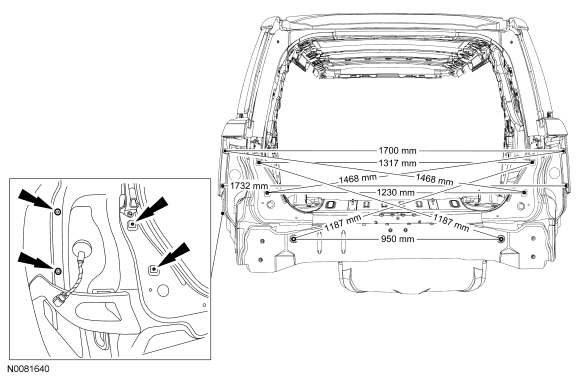
Rear Opening Dimensions
NOTE:
Measurements are obtained on center, unless otherwise indicated.

Underbody Dimensions
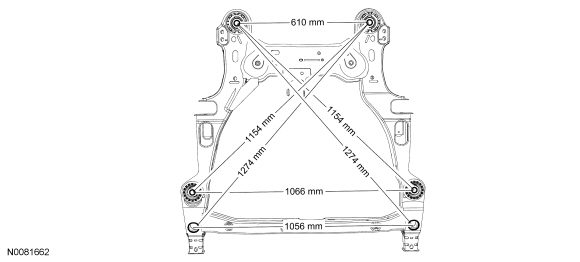
Front Subframe
NOTE:
Measurements are obtained on center, unless otherwise indicated.

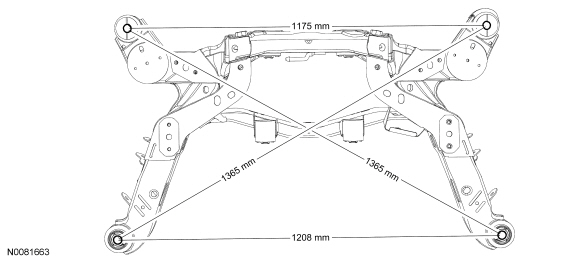
Rear Subframe
NOTE:
Measurements are obtained on center, unless otherwise indicated.

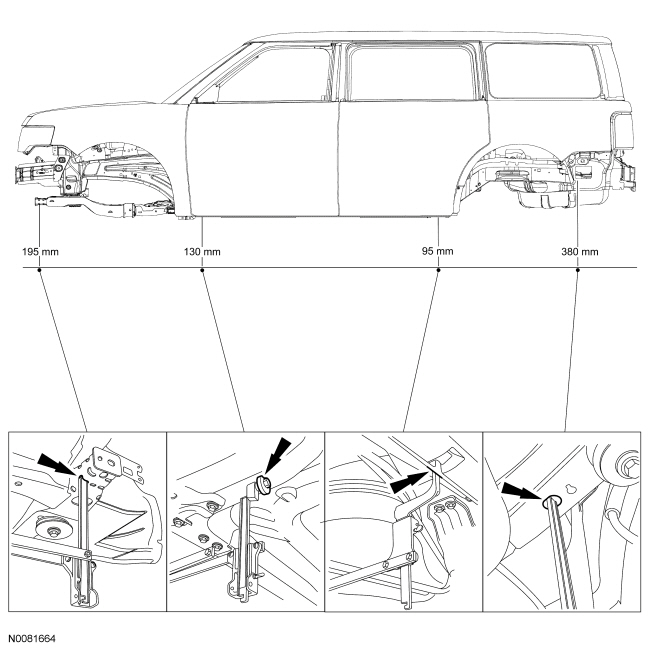
Frame Datum Height
NOTE:
Datum height determined measuring from holes and slots on center, unless otherwise indicated.

Underbody Dimensions
NOTE:
Measurements are obtained on center, unless otherwise indicated.

Underbody Dimensions
NOTE:
Measurements are obtained on center, unless otherwise indicated.

 WARNING: Collision damage repair must conform to the instructions contained in this workshop manual. Replacement components must be new, genuine Ford Motor Company parts. Recycled, salvaged, aftermarket or reconditioned parts (including body parts, wheels or safety restraint components) are not authorized by Ford.
