 WARNING: Before beginning any service procedure in this section, refer to Safety Warnings in
Section 100-00
. Failure to follow this instruction may result in serious personal injury.
SECTION 303-04B: Fuel Charging and Controls — 3.5L GTDI
| 2014 Flex Workshop Manual
|
REMOVAL AND INSTALLATION
| Procedure revision date: 05/02/2013
|
| Item | Specification |
|---|---|
| Motorcraft® SAE 5W-30 Premium Synthetic Blend Motor Oil (US); Motorcraft® SAE 5W-30 Super Premium Motor Oil (Canada)
XO-5W30-QSP (US); CXO-5W30-LSP12 (Canada); or equivalent | WSS-M2C946-A, 5W30; |
| Thread Sealant with PTFE
TA-24 | WSK-M2G350-A2 |
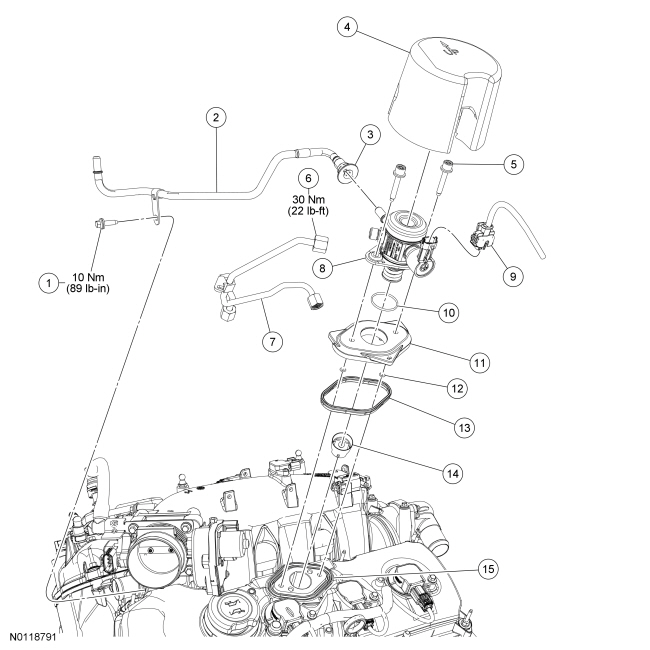
| Item | Part Number | Description |
|---|---|---|
| 1 | W503274 | Fuel jumper tube bolt |
| 2 | 9J280 | Fuel jumper tube |
| 3 | — | Fuel jumper tube-to-fuel injection pump quick connect coupling (part of 9J280) |
| 4 | 6N041 | Fuel injection pump noise insulator shield |
| 5 | W714498 | Fuel injection pump bolt (2 required) |
| 6 | — | High pressure fuel tube-to-fuel injection pump flare nut (part of 9J323) |
| 7 | 9J323 | High pressure fuel tube |
| 8 | 9350 | Fuel injection pump |
| 9 | 14A464 | Fuel injection pump electrical connector |
| 10 | 9E853 | Fuel injection pump O-ring seal (part of 9350) |
| 11 | 9178 | Fuel injection pump mounting plate (part of 9178) |
| 12 | 9374 | Fuel injection pump mounting plate O-ring seal (2 required) (part of 9178) |
| 13 | 9417 | Fuel injection pump mounting plate seal |
| 14 | 9C587 | Fuel injection pump tappet |
| 15 | — | Fuel injection pump mounting pedestal (part of 6049) |
Removal
 WARNING: Before beginning any service procedure in this section, refer to Safety Warnings in
Section 100-00
. Failure to follow this instruction may result in serious personal injury.
 WARNING: Do not smoke, carry lighted tobacco or have an open flame of any type when working on or near any fuel-related component. Highly flammable mixtures are always present and may be ignited. Failure to follow these instructions may result in serious personal injury.
 WARNING: Before working on or disconnecting any of the fuel tubes or fuel system components, relieve the fuel system pressure to prevent accidental spraying of fuel. Fuel in the fuel system remains under high pressure, even when the engine is not running. Failure to follow this instruction may result in serious personal injury.
 WARNING: Clean all fuel residue from the engine compartment. If not removed, fuel residue may ignite when the engine is returned to operation. Failure to follow this instruction may result in serious personal injury.
 WARNING: Always disconnect the battery ground cable at the battery when working on an evaporative emission (EVAP) system or fuel-related component. Highly flammable mixtures are always present and may be ignited. Failure to follow these instructions may result in serious personal injury.
NOTE: To release the fuel pressure in the high pressure fuel tube, wrap the flare nut with a shop towel to absorb any residual fuel pressure during the loosening of the flare nut.
Disconnect the high pressure fuel tube-to-fuel injection pump flare nut.Installation
NOTE: The cam lobe for the fuel injection pump must be at Bottom Dead Center (BDC) for the fuel injection pump installation.
Remove the fuel injection pump roller tappet.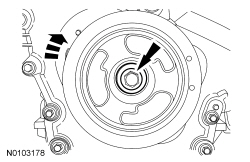
NOTE: The valve cover is removed for clarity.
NOTE: Apply clean engine oil to the fuel injection pump mounting pedestal bore.
Install the fuel injection pump roller tappet.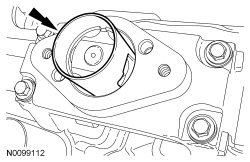
NOTE: Apply clean engine oil to the fuel injection pump mounting plate seal.
Inspect the fuel injection pump mounting plate seal and replace as necessary.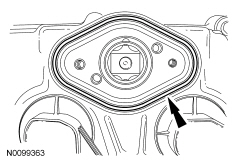
NOTE: Apply clean engine oil to the fuel injection pump mounting plate O-ring seals.
Inspect the 2 fuel injection pump mounting plate O-ring seals and replace as necessary.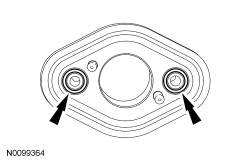
NOTE: Apply clean engine oil to the fuel injection pump O-ring seal.
Inspect the fuel injection pump O-ring seal and replace as necessary.NOTE: Make sure the mating surfaces are free of any dirt or foreign material.
NOTE: Apply clean engine oil to the fuel injection pump mounting plate bore.
NOTE: Orient the arrow on the fuel injection pump mounting plate towards the front of the engine.
Install the fuel injection pump mounting plate on the fuel injection pump.NOTE: Clean the fuel injection pump bolts and apply Thread Sealant with PTFE to the bolts.
Install the fuel injection pump with the fuel injection pump mounting plate and loosely install 2 new fuel injection pump bolts, alternately tighten each bolt one complete revolution until seated. Tighten the 2 fuel injection pump bolts in the following 2 stages.NOTE: To install, apply clean engine oil to the threads of the high-pressure fuel tube flare nut.
Connect the high-pressure fuel tube and tighten the flare nut in the following 3 stages.