SECTION 204-02: Rear Suspension
| 2014 Flex Workshop Manual
|
REMOVAL AND INSTALLATION
| Procedure revision date: 05/02/2013
|
Upper Arm
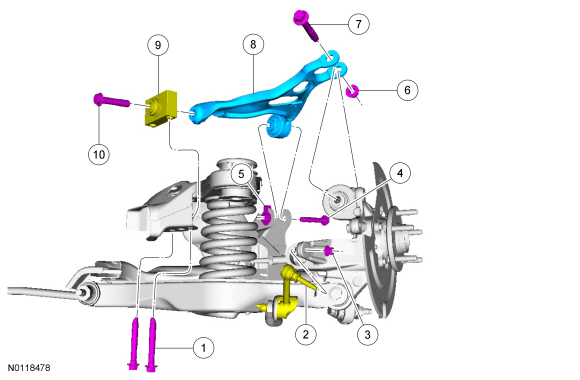
| Item
| Part Number
| Description
| | 1
| W715179
| Upper arm-to-subframe rearward bolt (2 required)
|
| 2
| 5K484
| Stabilizer bar link
|
| 3
| W520213
| Stabilizer bar link nut
|
| 4
| W715419
| Upper arm-to-subframe forward bolt
|
| 5
| W714175
| Upper arm-to-subframe forward nut
|
| 6
| W520517
| Upper arm-to-wheel knuckle nut
|
| 7
| W715127
| Upper arm-to-wheel knuckle bolt
|
| 8
| 5A804 LH/ 5502 RH
| Upper arm
|
| 9
| 5A638
| Upper arm rearward bushing
|
| 10
| W715493
| Upper arm rearward bushing bolt
|
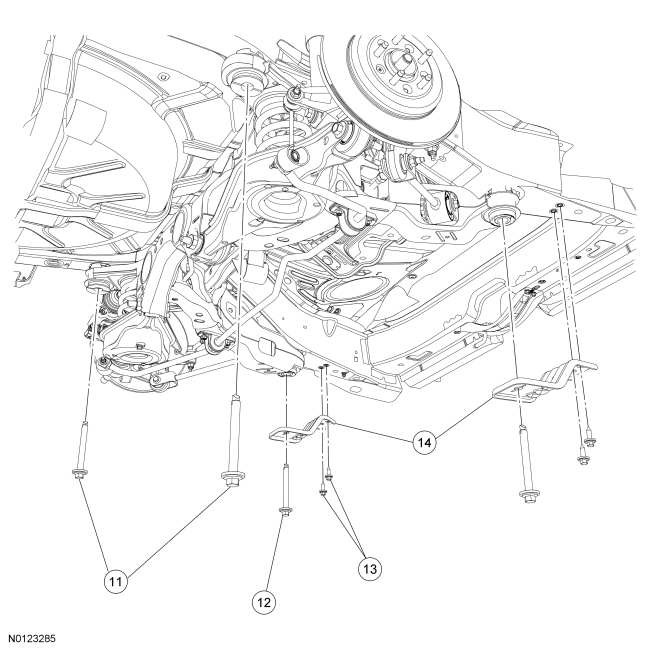
| Item
| Part Number
| Description
| | 11
| W713714
| Subframe rearward bolts (2 required)
|
| 12
| W713714
| Subframe forward bolt (2 required)
|
| 13
| W711270
| Subframe bracket bolts (4 required)
|
| 14
| 5084AA LH/ 5084AB RH
| Subframe brackets (2 required)
|
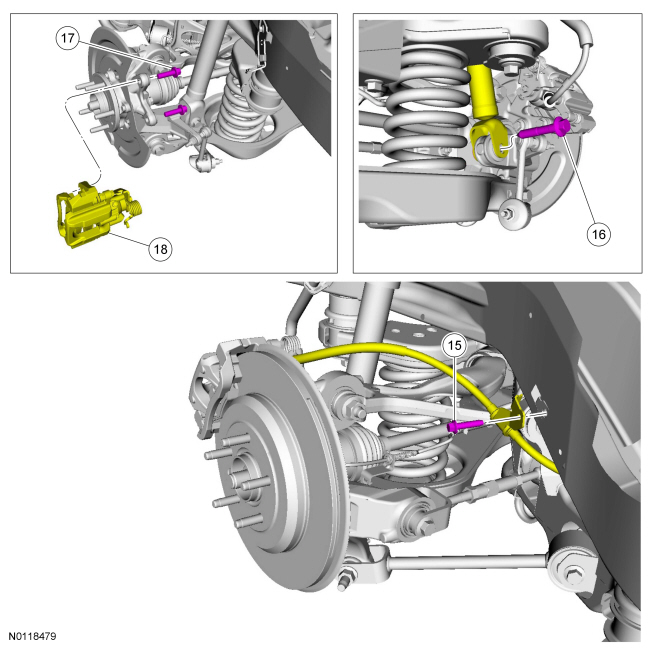
NOTE:
Brake disc has been removed for clarity.
| Item
| Part Number
| Description
| | 15
| W506423
| Parking brake cable bracket bolt
|
| 16
| W714366
| Shock absorber lower bolt
|
| 17
| W710681
| Brake caliper anchor plate bolt (2 required)
|
| 18
| —
| Brake caliper and anchor plate assembly
|
Removal
NOTICE:
Suspension fasteners are critical parts because they affect performance of vital components and systems and their failure may result in major service expense. New parts must be installed with the same part numbers or equivalent part, if replacement is necessary. Do not use a replacement part of lesser quality or substitute design. Torque values must be used as specified during reassembly to make sure of correct retention of these parts.
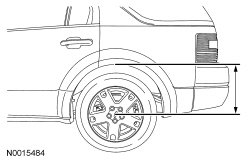
- Measure the distance from the center of the wheel hub to the lip of the fender with the vehicle in a level, static ground position (curb height).
- Remove the rear wheels and tires. For additional information, refer to
Section 204-04
.
- Remove LH and RH parking brake cable bracket bolts.
NOTICE:
Do not allow the brake caliper to hang from the brake flexible hose or damage to the hose may occur.
Remove the 4 brake caliper anchor plate bolts and position the LH and RH brake caliper and anchor plate assemblies aside.
- Support the brake caliper and anchor plate assemblies using mechanic's wire.
- Position screw-type jackstands under the LH and RH wheel knuckles.
- Remove and discard the upper arm-to-knuckle bolt and nut.
- Remove and discard the 2 upper arm-to-subframe rearward bolts.
NOTE:
Use the hex-holding feature to prevent the stabilizer bar link stud from turning while removing or installing the nut.
- Remove and discard the LH and RH stabilizer bar link upper nuts and disconnect the links from the stabilizer bar.
- Remove and discard the LH and RH lower shock bolts.
- Remove and discard the 4 subframe bracket bolts.
- Remove and discard the 2 subframe forward bolts and remove the 2 subframe brackets.
- Remove and discard the 2 subframe rearward bolts and lower the subframe enough to allow removal of the upper arm forward bolt.
- Remove and discard the upper arm-to-subframe forward bolt and nut.
- If service to the upper arm rearward bushing is required, remove the upper arm bushing bolt and remove the upper arm bushing.
Installation
NOTE:
Before tightening the shock absorber lower bolts and upper arm nut and bolts, use a jackstand to raise the rear suspension until the distance between the center of the hub and the lip of the fender is equal to the measurement taken in the Removal procedure (curb height).
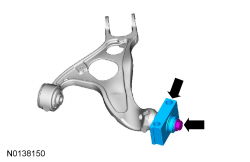
- If removed, install the upper arm bushing onto the upper arm in the following sequence.
- With the upper arm positioned so the top side is facing up and the upper arm bushing is positioned with the TOP OF PART facing up and the ARM TO THIS SIDE arrow is pointing toward the upper arm. Install the upper arm bushing.
- Install a new upper arm rearward bushing bolt and tighten to 200 Nm (148 lb-ft).
- Position the upper arm and loosely install the new upper arm-to-subframe forward bolt and nut.
- Raise the subframe and install 2 new subframe rearward bolts.
- Tighten to 200 Nm (148 lb-ft).
- Position the 2 subframe brackets and install 4 new subframe bracket bolts.
- Tighten to 55 Nm (41 lb-ft).
- Install 2 new subframe forward bolts.
- Tighten to 150 Nm (111 lb-ft).
- Loosely install new LH and RH shock absorber lower bolts.
NOTE:
Use the hex-holding feature to prevent the stabilizer bar link stud from turning while removing or installing the nut.
- Connect the LH and RH stabilizer bar links to the stabilizer bar and install the new nuts.
- Tighten to 55 Nm (41 lb-ft).
- Loosely install 2 new upper arm-to-subframe rearward bolts.
- Loosely install a new upper arm-to-knuckle bolt and nut.
- Position the LH and RH brake caliper and anchor plate assemblies and install the 4 anchor plate bolts.
- Tighten to 103 Nm (76 lb-ft).
- Install LH and RH parking brake cable bracket bolts.
- Tighten to 15 Nm (133 lb-in).
- Using the screw-type jackstand, raise the rear suspension until the distance between the center of the hub and the lip of the fender is equal to the measurement taken in the removal procedure (curb height).
- Tighten the upper arm-to-subframe forward bolt to 150 Nm (111 lb-ft).
- Tighten the LH and RH shock absorber lower bolts to 175 Nm (129 lb-ft).
- Tighten the 2 upper arm-to-subframe rearward bolts to 150 Nm (111 lb-ft).
NOTE:
A slotted upper arm allows for the rear suspension camber to be adjusted by pushing inward or pulling outward on the wheel knuckle while tightening the upper arm-to-wheel knuckle nut.
With the wheel knuckle pushed inward for maximum negative camber, tighten the upper arm-to-wheel knuckle nut to 200 Nm (148 lb-ft).
- Remove the 2 jackstands.
- Install the rear wheels and tires. For additional information, refer to
Section 204-04
.
- Check and, if necessary, adjust the rear camber. For additional information, refer to
Section 204-00
.
