SECTION 205-00: Driveline System — General Information
| 2014 Flex Workshop Manual
|
DESCRIPTION AND OPERATION
| Procedure revision date: 05/02/2013
|
The driveline system consists of the following components:
On Front Wheel Drive (FWD) vehicles, the transaxle transmits power from the engine to the halfshafts.
On All-Wheel Drive (AWD) vehicles, power is transmitted from the engine through the transaxle to the Power Transfer Unit (PTU). The PTU transfers engine power from the transaxle to the front halfshafts, and through the driveshaft to the ATC / rear axle and halfshafts. For information on the PTU , refer to Section 308-07B .
The engine angle is built into the engine mounts. If the engine angle is out of specification, the engine mounts must be inspected for damage. Refer to the appropriate section in Group 303 for the procedure.

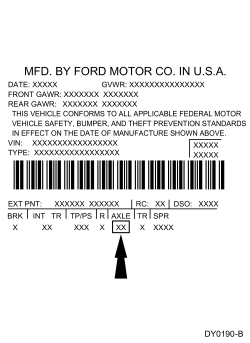
The Vehicle Certification (VC) label is located in the driver door jamb. The axle code is on the VC label. Refer to Section 100-01 .
The axle ratio is 2.93 and the ring gear has a diameter of 174 mm (6.85 in).
The wheel speed sensor rings for FWD vehicles are located on the front halfshafts and are mounted to the rear inner spindles.
The wheel speed sensor rings are located on the front and rear halfshafts for AWD vehicles.
Driveshaft
The driveshaft is a 3-piece shaft with a rubber isolated center bearing.
The driveshaft is a balanced assembly and has traditional balance weights attached (spot-welded) by the manufacturer.
U-joints
The CV and U-joints are installed new with the driveshaft.
The front and rear CV joints are:
The center U-joints are:
Rear Drive Unit (RDU)
The ATC /Rear Drive Unit (RDU) is serviced as an assembly.
Each halfshaft is held in the RDU case by a driveshaft bearing retainer circlip that is located on the inner CV joint stub shaft pilot bearing housing. When each halfshaft is installed, the driveshaft bearing retainer circlip engages a slot in the RDU side gear.
The RDU operates as follows:
Halfshafts
NOTICE: An inspection of the outer and inner Constant Velocity (CV) joint boots is necessary so that if damage or grease leakage is evident, installation of a new halfshaft can take place immediately. Continued operation with damage or grease leakage will result in CV joint wear and noise due to contamination and loss of the CV joint grease.
The drive halfshafts consist of the following components:
The front intermediate shaft bearing is pressed on and is only serviced as an assembly with the intermediate shaft.
Halfshaft Handling
NOTICE: Handle the halfshaft only by the interconnecting shaft to avoid pull-apart and potential damage to the Constant Velocity (CV) joints. Damage will occur to an assembled inner CV joint if it is over-plunged outward from the joint housing or over angled.
NOTICE: When disconnecting the lower ball joint, do not allow the stud to impact the halfshaft as this may damage the Constant Velocity (CV) joint boot seal.
Handle all halfshaft components carefully during removal and installation procedures. Never use a hammer to remove or install the halfshafts. Never use the halfshaft assembly as a lever to position other components. Always support the free-end of the halfshaft. Do not allow the boots to contact sharp edges or hot exhaust components. Do not drop assembled halfshafts. The impact may cut the boots from the inside without evidence of external damage. When disconnecting the lower ball joint, do not allow the stud to impact the halfshaft as this may damage the CV joint bolt seal.