SECTION 205-02: Rear Drive Axle/Differential
| 2014 Flex Workshop Manual
|
REMOVAL AND INSTALLATION
| Procedure revision date: 05/02/2013
|

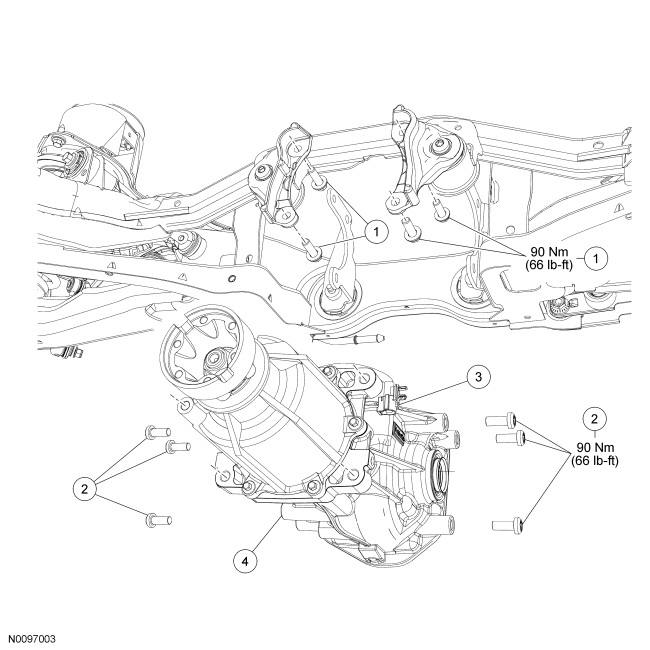
| Item | Part Number | Description |
|---|---|---|
| 1 | W713482 | Differential housing-to-front insulator bracket bolts (4 required) |
| 2 | W709862 | Side insulator bracket-to-rear axle differential bolts (6 required) (aluminum rear cover) |
| 2 | W716158 | Side insulator bracket-to-rear axle differential bolts (6 required) (stamped steel rear cover) |
| 3 | — | Active Torque Coupling (ATC) electrical connector (part of 4000) |
| 4 | 4000 | Rear axle assembly |
Removal
All vehicles
Vehicles equipped with an
RDU
with a aluminum cover

All vehicles
Installation
All vehicles
Vehicles equipped with an
RDU
with a aluminum differential cover

All vehicles
NOTICE: If replacing the axle assembly, the 4X4 control module will need to be reconfigured with the new Active Torque Coupling (ATC) bar code information. If the new bar code information does not match the existing 4X4 control module information, driveline damage or driveability concerns can occur.
If installing a new RDU, re-configure the Automatic Torque Coupling (ATC). Refer to Section 308-07A .