
205-907

205-883

205-346

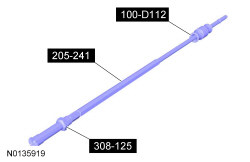
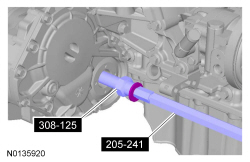
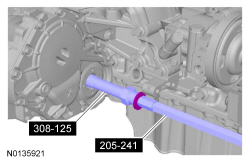
205-241

308-125 (T87P-7120-D)

100-D112
SECTION 308-07B: Transfer Case — Power Transfer Unit (PTU)
| 2014 Flex Workshop Manual
|
REMOVAL AND INSTALLATION
| Procedure revision date: 05/02/2013
|
 | Handle, Driver (32 in)
205-907 |
 | Installer, PTU Linkshaft Seal
205-883 |
 | Installer, Front Axle Bushing
205-346 |
 | Remover, Halfshaft
205-241 |
 | Remover, Transfer Case Bearing Cup
308-125 (T87P-7120-D) |
 | Slide Hammer Master Set
100-D112 |
| 16 mm (5/8 in) washer (used with 308-125) |
| Item | Specification |
|---|---|
| MERCON® V Automatic Transmission Fluid
XT-5-QM (or XT-5-QMC) (US); CXT-5-LM12 (Canada) | MERCON® V |
| Metal Brake Parts Cleaner
PM-4-A or PM-4-B (US); CPM-4 (Canada) | — |
| Motorcraft® MERCON® LV Automatic Transmission Fluid
XT-10-QLVC (US); CXT-10-LV12 (Canada) | MERCON® LV |
| Silicone Brake Caliper Grease and Dielectric Compound
XG-3-A | ESE-M1C171-A |
Removal
NOTE:
For high resolution:
 Click here to view a video version of this procedure.
NOTE:
For low resolution:
 Click here to view a video version of this procedure.
NOTE: The PTU may leak different color fluids, red fluid leak for automatic transmission fluid and brown/black gear lube for PTU fluid. The PTU seals prevent these types of fluids from leaking. It is important to note which color fluid is leaking to determine the most appropriate service procedure. This procedure will correct a red fluid leak (automatic transmission fluid) from the intermediate shaft seal on the RH side of the PTU . Refer to Analysis of Leakage under Power Transfer Unit (PTU) .
NOTE: This procedure is to be performed through the RH wheel opening. It is not necessary to remove the exhaust components to complete this repair.
NOTE: The following instruction will prevent the Remover, Transfer Case Bearing Cup 308-125 (T87P-7120-D) from opening too far which would make removing the intermediate shaft seal deflector difficult.
Special Tool(s): Remover, Transfer Case Bearing Cup 308-125 (T87P-7120-D).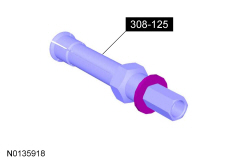
NOTICE: Failure to utilize the recommended tools may result in serious damage to the PTU .
Installation
NOTE: The following illustration shows the correct orientation of the seal components when installed in the vehicle.
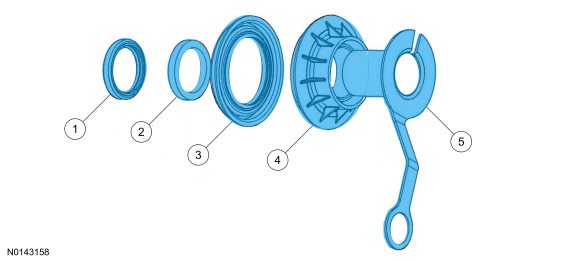
| Item | Description |
|---|---|
| 1 | Intermediate shaft seal (part of 7275 kit) — retains red automatic transmission fluid used in the transmission |
| 2 | Alignment washer (part of 7275 kit) — supports and centers the intermediate shaft in the seal |
| 3 | Cover Seal (part of 7275 kit) — keeps dust/dirt away from the intermediate shaft seal |
| 4 | Seal deflector (part of 7275 kit) — keeps dust/dirt away from the PTU input shaft seal |
| 5 | Seal protector (part of 7275 kit) — protects intermediate shaft seal from damage by the intermediate shaft splines during installation. Must be removed before shaft is fully installed |
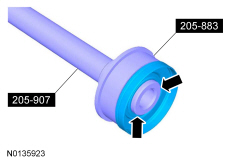
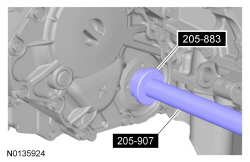
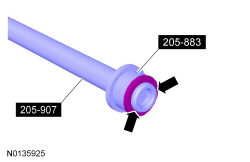
NOTICE: Do not use force when installing the alignment washer or damage to the washer can occur.
Special Tool(s): Installer, PTU Linkshaft Seal 205-883, Handle, Driver 812.8 mm (32 in) 205-907.
NOTICE: Do not overheat (melt) the seal deflector. Monitor the temperature of the deflector with a temperature measuring device, such as a digital temperature laser or infrared thermometer, while heating. Do not allow the temperature to exceed 100°C (212°F). Overheating will damage the deflector. If the deflector is damaged, a new deflector must be used.
NOTE: Apply a small amount of silicone brake caliper grease and dielectric compound to the inner lip of the deflector where it installs on the tube inside the PTU before heating. This will ease the installation of the deflector.
Hot air gun.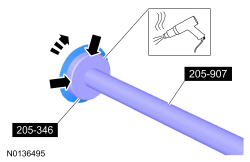
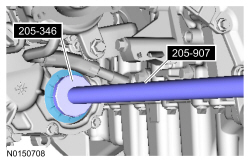
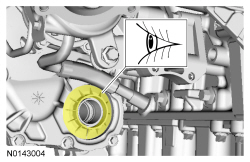
NOTE: A significant amount of residual fluid will collect between the seal and deflector during this repair. This is a normal condition and should not be misinterpreted as a leak after the repair is complete.
Using metal brake parts cleaner, thoroughly clean the deflector and intermediate shaft area of any residual fluid that may have accumulated during the repair.