SECTION 415-00A: Information and Entertainment Systems — 4.2-Inch (107 mm) Screen, 6 Speakers
| 2014 Flex Workshop Manual
|
REMOVAL AND INSTALLATION
| Procedure revision date: 05/02/2013
|
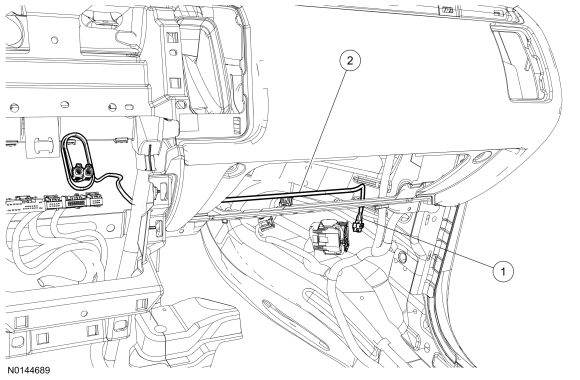
Antenna Cable — AM/FM
NOTE:
Only the front AM/FM antenna cable is shown.
NOTE:
Glove compartment shown removed for clarity.

| Item
| Part Number
| Description
| | 1
| —
| Front-to-rear AM/FM antenna cable connection (part of 18812)
|
| 2
| —
| Front AM/FM antenna cable
|
Removal and Installation
NOTE:
Both the front and rear AM/FM antenna cables are part of the vehicle wiring harness. Because the cables cannot be removed from the harness, this procedure applies to replacement of the cables only.
Front cable
- Remove the Audio Front Control Module (ACM). For additional information, refer to
Audio Control Module (ACM)
in this section.
- Lower the glove compartment completely.
Rear cable
- Remove the RH front scuff plate trim panel. For additional information, refer to
Section 501-05
.
- Remove the RH quarter trim panel. For additional information, refer to
Section 501-05
.
- Remove the LH D-pillar trim panel. For additional information, refer to
Section 501-05
.
- Remove the rear dome lamp. For additional information, refer to Interior Lamp in
Section 417-02
.
- Carefully lower the rear of the headliner to gain access to the antenna bolt.
- Loosen the antenna cable bolt and disconnect the cable from the antenna.
- To install, tighten to 8 Nm (71 lb-in).
Both cables
NOTE:
Pull the carpet back to access the antenna connection.
Disconnect the front-to-rear AM/FM antenna connection at the RH kick panel.
- Cut the ends of the existing cable and tape them back to prevent NVH concerns.
- To install, reverse the removal procedure.
- Overlay the new AM/FM antenna cable on the vehicle wiring harness, following the routing of the original cable.
- Secure the new AM/FM antenna cable with tape or zip ties, as necessary.
