SECTION 501-09: Rear View Mirrors
2014 Flex Workshop Manual
DIAGNOSIS AND TESTING
Procedure revision date: 05/23/2013

Rear View Mirrors — Interior


Symptom Chart

Diagnostics in this manual assume a certain skill level and knowledge of Ford-specific diagnostic practices. Refer to Section 100-00 for information regarding these diagnostic practices.

 
Symptom Chart — Interior Mirror
Condition Possible Sources Action
  • The interior mirror vibrates/loose
  • Interior mirror mounting loose
  • If the mirror is still on the windshield do not remove. ATTEMPT to fully seat the mirror first. If the mirror is still loose or vibrates, REMOVE and REINSTALL the mirror. REFER to Interior Rear View Mirror in this section. If the condition still exists, INSTALL a new mirror.
  • The interior mirror is blemished
  • Interior mirror glass/housing is dirty
  • NOTE: Do not clean the housing or glass of any mirror with harsh abrasives, fuel or other petroleum-based cleaning products.
  • CLEAN the affected interior mirror surface.

  • The auto-dimming mirror does not operate correctly
  • Obstructed forward or rear-facing sensor
    • Stickers, window decals, tags
    • Non-OEM window tinting
  • If possible, REMOVE the obstruction. If the obstruction cannot be removed, GO to Pinpoint Test G to TEST the auto-dimming mirror for correct function.
    • Light source near or inside of vehicle
    • None. Any light source the rear-facing sensor is exposed to can be considered glare.
      • Vehicle inside garage or tunnel
      • None. Ambient light conditions are similar to nighttime.
        • Refer to the Diagnostic Routine
         

        Pinpoint Test G: The Auto-Dimming Mirror Does Not Operate Correctly

        Diagnostic Overview

        Diagnostics in this manual assume a certain skill level and knowledge of Ford-specific diagnostic practices. Refer to Diagnostic Methods in Section 100-00 for information about these practices.

        Refer to Wiring Diagrams Cell 124 , Power Mirrors for schematic and connector information.

        Normal Operation and Fault Conditions

        Refer to Rear View Mirrors .

        Possible Sources

         
        PINPOINT TEST G: THE AUTO-DIMMING MIRROR DOES NOT OPERATE CORRECTLY

        NOTE: If the Transmission Range (TR) sensor is malfunctioning and the backup lamps are on all the time or do not turn on, the LH exterior auto-dimming mirror (if equipped) and the interior auto-dimming mirror will not darken or return to normal view.

        Test Step Result / Action to Take
          G1 CHECK THE OPERATION OF THE REVERSING LAMPS  
        • Ignition ON.
        • Move the selector lever through the entire range.
        • Do the reversing lamps illuminate only in REVERSE?
        Yes
        GO to G2 .

        No
        REFER to Section 417-01 to diagnose the reversing lamps.
          G2 VERIFY THE FORWARD AND REARWARD FACING SENSORS ARE NOT BLOCKED  
        • Visually verify the forward and rearward facing sensors are not blocked. Sources of blockage can include:
          • stickers, window decals or tags.
          • fold-down screens for TVs or DVD players.
          • non- OEM window tinting.
        • Were either of the sensors blocked?
        Yes
        If possible, REMOVE the blockage. If the blockage cannot be removed, ADVISE the customer that the blockage will effect the correct operation of the interior auto-dimming mirror.

        No
        GO to G3 .
          G3 CHECK THE OPERATION OF THE INTERIOR AUTO-DIMMING MIRROR — DAYLIGHT CONDITIONS  
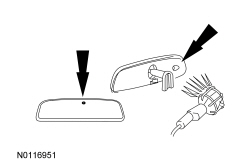
        • Use a bright lamp to illuminate the forward facing sensor and the rearward facing sensor. The mirror should adjust to a high reflectance mode (mirror will be clear).


        • Did the mirror adjust to the high reflectance (clear) mode?
        Yes
        GO to G4 .

        No
        INSTALL a new interior mirror. REFER to Interior Rear View Mirror .
          G4 CHECK THE OPERATION OF THE INTERIOR AUTO-DIMMING MIRROR — NIGHTTIME CONDITIONS WITH GLARE  
        • Select PARK.
        • Simulate nighttime conditions with glare:
          • NOTE: Covering the sensor with a finger or hand is not adequate.
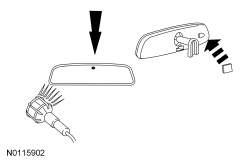
          • Cover the forward facing sensor with black electrical tape or other dark material.
          • Illuminate the rearward facing sensor. The mirror should darken to a lower reflectance mode.


        • Did the mirror darken to a lower reflectance (darker) mode?
        Yes
        GO to G5 .

        No
        GO to G7 .
          G5 CHECK THE OPERATION OF THE INTERIOR AUTO-DIMMING MIRROR — NIGHTTIME CONDITIONS WITHOUT GLARE  
        • Simulate nighttime conditions without glare:
          • NOTE: Covering the sensor with a finger or hand is not adequate.
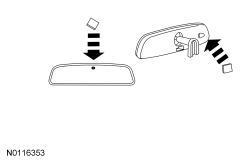
          • Cover the forward facing sensor with black electrical tape or other dark material.
          • Cover the rearward facing sensor. The mirror should adjust to the high reflectance mode.


        • Did the mirror adjust to the high reflectance (clear) mode?
        Yes
        GO to G6 .

        No
        GO to G7 .
          G6 CHECK THE OPERATION OF THE INTERIOR AUTO-DIMMING MIRROR — NIGHTTIME CONDITIONS WITH THE VEHICLE IN REVERSE  
        • Simulate nighttime conditions with glare:
          • NOTE: Covering the sensor with a finger or hand is not adequate.

          • Cover the forward facing sensor with black electrical tape or other dark material.
          • Illuminate the rearward-facing sensor.


        • Select REVERSE.
        • Did the mirror adjust to a high reflectance (clear) mode?
        Yes
        The system is operating correctly at this time. REVIEW the operation of the interior auto-dimming mirror feature with the customer.

        No
        GO to G7 .
          G7 CHECK FOR VOLTAGE TO THE INTERIOR AUTO-DIMMING MIRROR  
        • Ignition OFF.
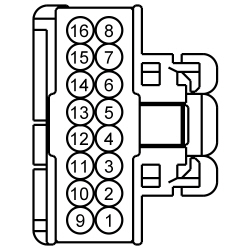
        • Disconnect: Interior Mirror C911.
        • Ignition ON.
        • Measure the voltage between:


        • Positive Lead Negative Lead
          Pin Circuit Pin Circuit
          C911-1 CBP32 (GN/VT) Ground

        • Is the voltage greater than 11 volts?
        Yes
        GO to G8 .

        No
        VERIFY that BCM fuse 32 (15A) is OK. If OK, REPAIR the circuit. If not OK, REFER to the Wiring Diagrams manual to identify the possible causes of the circuit short.
          G8 CHECK FOR GROUND TO THE INTERIOR AUTO-DIMMING MIRROR  
        • Ignition OFF.
        • Measure the resistance between:


        • Positive Lead Negative Lead
          Pin Circuit Pin Circuit
          C911-4 GD233 (BK) Ground

        • Is the resistance less than 3 ohms?
        Yes
        GO to G9 .

        No
        REPAIR the circuit.
          G9 CHECK FOR VOLTAGE TO THE INTERIOR AUTO-DIMMING MIRROR REVERSE CIRCUIT  
        • Ignition ON.
        • Select REVERSE.
        • Measure the voltage between:


        • Positive Lead Negative Lead
          Pin Circuit Pin Circuit
          C911-9 CLS28 (BU/WH) Ground


        • Is the voltage greater than 11 volts?
        Yes
        INSTALL a new interior mirror. REFER to Interior Rear View Mirror .

        No
        REPAIR the circuit.