
FLU77-4 or equivalent


NUD105-R025D or equivalent
SECTION 418-00: Module Communications Network
| 2014 Flex Workshop Manual
|
DIAGNOSIS AND TESTING
| Procedure revision date: 07/31/2013
|
 | Fluke 77-IV Digital Multimeter
FLU77-4 or equivalent |
 | Vehicle Communication Module (VCM) and Integrated Diagnostic System (IDS) software with appropriate hardware, or equivalent scan tool
|
 | Flex Probe Kit
NUD105-R025D or equivalent |
Symptom Chart
Diagnostics in this manual assume a certain skill level and knowledge of Ford-specific diagnostic practices. Refer to Diagnostic Methods in Section 100-00 for information about these practices.
| Condition | Possible Sources | Action |
|---|---|---|
|
| |
|
|
|
|
| |
|
| |
|
| |
|
| |
|
| |
|
| |
|
| |
|
| |
|
| |
|
| |
|
| |
|
| |
|
| |
|
| |
|
| |
|
| |
|
| |
|
| |
|
| |
|
| |
|
| |
|
| |
|
| |
|
| |
|
| |
|
| |
|
| |
|
|
Pinpoint Tests
Pinpoint Test A: The PCM Does Not Respond To The Scan Tool
Diagnostics in this manual assume a certain skill level and knowledge of Ford-specific diagnostic practices. Refer to Diagnostic Methods in Section 100-00 for information about these practices.
Refer to Wiring Diagrams Cell 14 , Module Communications Network for schematic and connector information.
Refer to Wiring Diagrams Cell 24 , Electronic Engine Controls - 3.5L Ti-VCT for schematic and connector information.
Refer to Wiring Diagrams Cell 25 , Electronic Engine Controls - 3.5L GTDI for schematic and connector information.
The PCM communicates with the scan tool through the High Speed Controller Area Network (HS-CAN). An IDS session cannot be established if the PCM communication fails when attempting to identify the vehicle.
NOTE: Failure to disconnect the battery when instructed will result in false resistance readings. Refer to Section 414-01 .
| Test Step | Result / Action to Take | ||||||||||||||||
|---|---|---|---|---|---|---|---|---|---|---|---|---|---|---|---|---|---|
| A1 VERIFY WHETHER OTHER HS-CAN MODULES PASS THE NETWORK TEST | |||||||||||||||||
| Yes
If "pass" or a DTC was listed next to the PCM, a network fault is not currently present. If "pass" or a DTC was listed next to one or more modules other than the PCM, GO to A2 . No No modules are currently communicating on the HS-CAN . GO to Pinpoint Test Z to diagnose no HS-CAN communication. | ||||||||||||||||
| A2 PC/ED PINPOINT TEST QA VERIFICATION | |||||||||||||||||
| Yes
GO to A3 . No REFER to the Powertrain Control/Emissions Diagnosis (PC/ED) manual, Section 5, pinpoint test QA to diagnose no communication with the PCM. | ||||||||||||||||
| A3 CHECK THE HS-CAN TERMINATION RESISTANCE | |||||||||||||||||
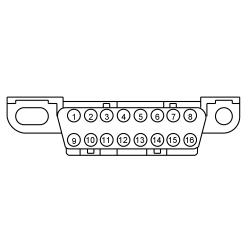 | Yes
GO to A6 . No For 3.5L Ti-VCT engine, GO to A4 . For 3.5L GTDI engine, GO to A5 . | ||||||||||||||||
| A4 CHECK THE HS-CAN CIRCUITS BETWEEN THE PCM AND THE DLC FOR AN OPEN — 3.5L Ti-VCT | |||||||||||||||||
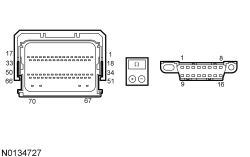 | Yes
CONNECT the negative battery cable. GO to A6 . No REPAIR the circuit in question. CONNECT the negative battery cable. | ||||||||||||||||
| A5 CHECK THE HS-CAN CIRCUITS BETWEEN THE PCM AND THE DLC FOR AN OPEN — 3.5L GTDI | |||||||||||||||||
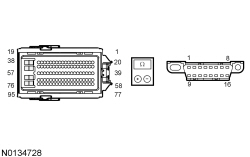 | Yes
CONNECT the negative battery cable. GO to A6 . No REPAIR the circuit in question. CONNECT the negative battery cable. | ||||||||||||||||
| A6 CHECK FOR CORRECT PCM OPERATION | |||||||||||||||||
| Yes
CHECK OASIS for any applicable TSBs. If a TSB exists for this concern, DISCONTINUE this test and FOLLOW TSB instructions. If no TSBs address this concern, INSTALL a new PCM. REFER to Section 303-14 . No The system is operating correctly at this time. The concern may have been caused by a loose or corroded connector. ADDRESS the root cause of any connector or pin issues. | ||||||||||||||||
Pinpoint Test B: The ABS Module Does Not Respond To The Scan Tool
Diagnostics in this manual assume a certain skill level and knowledge of Ford-specific diagnostic practices. Refer to Diagnostic Methods in Section 100-00 for information about these practices.
Refer to Wiring Diagrams Cell 14 , Module Communications Network for schematic and connector information.
Refer to Wiring Diagrams Cell 42 , Vehicle Dynamic Systems for schematic and connector information.
The ABS module communicates with the scan tool through the High Speed Controller Area Network (HS-CAN).
Verify BJB fuse 5 (50A), fuse 43 (20A) and fuse 89 (10A) are OK.
NOTE: Failure to disconnect the battery when instructed will result in false resistance readings. Refer to Section 414-01 .
| Test Step | Result / Action to Take | ||||||||||||||||||||
|---|---|---|---|---|---|---|---|---|---|---|---|---|---|---|---|---|---|---|---|---|---|
| B1 CHECK THE VOLTAGE SUPPLY CIRCUIT FOR AN OPEN | |||||||||||||||||||||
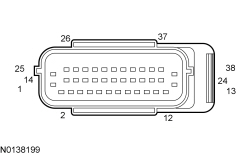 | Yes
GO to B2 . No VERIFY the Battery Junction Box (BJB) fuse 5 (50A), fuse 43 (20A) or fuse 89 (10A) is OK. If OK, REPAIR the circuit in question. If not OK, REFER to the Wiring Diagrams manual to identify the possible causes of the circuit short. | ||||||||||||||||||||
| B2 CHECK THE GROUND CIRCUIT FOR AN OPEN | |||||||||||||||||||||
 | Yes
GO to B3 . No REPAIR the circuit in question. CONNECT the negative battery cable. | ||||||||||||||||||||
| B3 CHECK THE HS-CAN CIRCUITS BETWEEN THE DLC AND THE ABS MODULE FOR AN OPEN | |||||||||||||||||||||
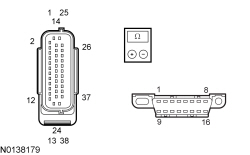 | Yes
CONNECT the negative battery cable. GO to B4 . No REPAIR the circuit in question. CONNECT the negative battery cable. | ||||||||||||||||||||
| B4 CHECK FOR CORRECT ABS MODULE OPERATION | |||||||||||||||||||||
| Yes
CHECK OASIS for any applicable TSBs. If a TSB exists for this concern, DISCONTINUE this test and FOLLOW TSB instructions. If no TSBs address this concern, INSTALL a new ABS module. REFER to Section 206-09 . No The system is operating correctly at this time. The concern may have been caused by a loose or corroded connector. ADDRESS the root cause of any connector or pin issues. | ||||||||||||||||||||
Pinpoint Test C: The Body Control Module (BCM) Does Not Respond To The Scan Tool
Diagnostics in this manual assume a certain skill level and knowledge of Ford-specific diagnostic practices. Refer to Diagnostic Methods in Section 100-00 for information about these practices.
Refer to Wiring Diagrams Cell 10 , Grounds for schematic and connector information.
Refer to Wiring Diagrams Cell 13 , Power Distribution/BCM for schematic and connector information.
Refer to Wiring Diagrams Cell 14 , Module Communications Network for schematic and connector information.
The Body Control Module (BCM) communicates with the scan tool through the High Speed Controller Area Network (HS-CAN) and communicates with the other modules through the Medium Speed Controller Area Network (MS-CAN).
Verify high current BJB fuse 1 (100A) is OK.
NOTE: Failure to disconnect the battery when instructed results in false resistance readings. Refer to Section 414-01 .
| Test Step | Result / Action to Take | ||||||||||||||||
|---|---|---|---|---|---|---|---|---|---|---|---|---|---|---|---|---|---|
| C1 CHECK THE HS-CAN TERMINATION RESISTANCE | |||||||||||||||||
 | Yes
GO to C3 . No GO to C2 . | ||||||||||||||||
| C2 CHECK THE HS-CAN CIRCUITS BETWEEN THE BCM AND THE DLC FOR AN OPEN | |||||||||||||||||
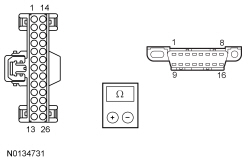 | Yes
GO to C7 . No REPAIR the circuit in question. | ||||||||||||||||
| C3 CHECK THE MS-CAN TERMINATION RESISTANCE | |||||||||||||||||
 | Yes
GO to C5 . No GO to C4 . | ||||||||||||||||
| C4 CHECK THE MS-CAN CIRCUITS BETWEEN THE BCM AND THE DLC FOR AN OPEN | |||||||||||||||||
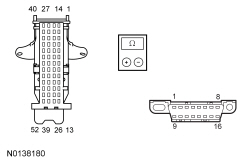 | Yes
GO to C7 . No REPAIR the circuit in question. | ||||||||||||||||
| C5 CHECK THE BCM VOLTAGE SUPPLY CIRCUIT FOR AN OPEN | |||||||||||||||||
NOTE: Measurements are taken with the fuse installed and probes placed at the terminals on the back of the fuse blade.
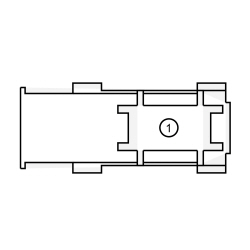 | Yes
GO to C6 . No VERIFY the high current BJB fuse 1 (100A) is OK. If OK, REPAIR the circuit in question. If not OK, REFER to the Wiring Diagrams manual to identify the possible causes of the circuit short. | ||||||||||||||||
| C6 CHECK THE BCM GROUND CIRCUIT FOR AN OPEN | |||||||||||||||||
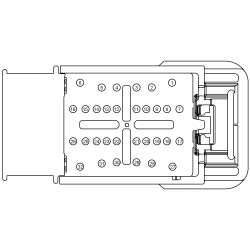 | Yes
GO to C7 . No REPAIR the circuit in question. | ||||||||||||||||
| C7 CHECK FOR CORRECT BCM OPERATION | |||||||||||||||||
| Yes
CHECK OASIS for any applicable TSBs. If a TSB exists for this concern, discontinue this test and follow TSB instructions. If no TSBs address this concern, INSTALL a new BCM . REFER to Section 419-10 . No The system is operating correctly at this time. The concern may have been caused by a loose or corroded connector. | ||||||||||||||||
Pinpoint Test D: The Instrument Panel Cluster (IPC) Does Not Respond To The Scan Tool
Diagnostics in this manual assume a certain skill level and knowledge of Ford-specific diagnostic practices. Refer to Diagnostic Methods in Section 100-00 for information about these practices.
Refer to Wiring Diagrams Cell 14 , Module Communications Network for schematic and connector information.
Refer to Wiring Diagrams Cell 60 , Instrument Cluster for schematic and connector information.
The Instrument Panel Cluster (IPC) communicates with the scan tool and other network modules on the High Speed Controller Area Network (HS-CAN) and communicates with other network modules through the Infotainment Controller Area Network (I-CAN).
Verify BCM fuse 23 (15A) is OK.
NOTE: Failure to disconnect the battery when instructed will result in false resistance readings. Refer to Section 414-01 .
| Test Step | Result / Action to Take | ||||||||||||||||
|---|---|---|---|---|---|---|---|---|---|---|---|---|---|---|---|---|---|
| D1 CHECK THE I-CAN TERMINATION RESISTANCE | |||||||||||||||||
 | Yes
GO to D3 . No GO to D2 . | ||||||||||||||||
| D2 CHECK THE I-CAN CIRCUITS BETWEEN THE IPC AND THE DLC FOR AN OPEN | |||||||||||||||||
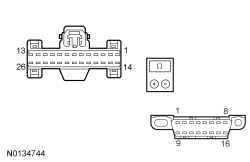 | Yes
GO to D5 . No REPAIR the circuit in question. | ||||||||||||||||
| D3 CHECK THE HS-CAN CIRCUITS BETWEEN THE IPC AND THE DLC FOR AN OPEN | |||||||||||||||||
 | Yes
GO to D4 . No REPAIR the circuit in question. | ||||||||||||||||
| D4 CHECK THE IPC VOLTAGE SUPPLY CIRCUIT FOR AN OPEN | |||||||||||||||||
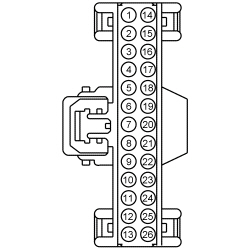 | Yes
GO to D5 . No VERIFY BCM fuse 23 (15A) is OK. If OK, REPAIR the circuit. If not OK, REFER to the Wiring Diagrams manual to identify the possible causes of the circuit short. | ||||||||||||||||
| D5 CHECK THE IPC GROUND CIRCUIT FOR AN OPEN | |||||||||||||||||
 | Yes
GO to D6 . No REPAIR the circuit. | ||||||||||||||||
| D6 CHECK FOR CORRECT IPC OPERATION | |||||||||||||||||
| Yes
CHECK OASIS for any applicable TSBs. If a TSB exists for this concern, discontinue this test and follow TSB instructions. If no TSBs address this concern, INSTALL a new IPC . REFER to Section 413-01 . No The system is operating correctly at this time. The concern may have been caused by a loose or corroded connector. ADDRESS the root cause of any connector or pin issues. | ||||||||||||||||
Pinpoint Test E: The Power Steering Control Module (PSCM) Does Not Respond To The Scan Tool
Diagnostics in this manual assume a certain skill level and knowledge of Ford-specific diagnostic practices. Refer to Diagnostic Methods in Section 100-00 for information about these practices.
Refer to Wiring Diagrams Cell 14 , Module Communications Network for schematic and connector information.
Refer to Wiring Diagrams Cell 43 , Power Steering Controls for schematic and connector information.
The Power Steering Control Module (PSCM) communicates with the scan tool through the High Speed Controller Area Network (HS-CAN).
Verify BJB fuse 4 (100A) or fuse 92 (5A) is OK.
NOTE: Failure to disconnect the battery when instructed will result in false resistance readings. Refer to Section 414-01 .
| Test Step | Result / Action to Take | ||||||||||||||||
|---|---|---|---|---|---|---|---|---|---|---|---|---|---|---|---|---|---|
| E1 CHECK THE PSCM VOLTAGE SUPPLY CIRCUIT FOR AN OPEN | |||||||||||||||||
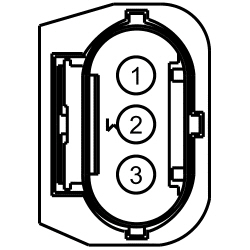 | Yes
GO to E2 . No VERIFY the Battery Junction Box (BJB) fuse 92 (5A) is OK. If OK, REPAIR the circuit in question. If not OK, REFER to the Wiring Diagrams manual to identify the possible causes of the circuit short. | ||||||||||||||||
| E2 CHECK THE PSCM GROUND CIRCUIT FOR AN OPEN | |||||||||||||||||
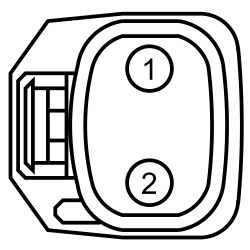 | Yes
GO to E3 . No REPAIR the circuit in question. | ||||||||||||||||
| E3 CHECK THE HS-CAN CIRCUITS BETWEEN THE PSCM AND THE DLC FOR AN OPEN | |||||||||||||||||
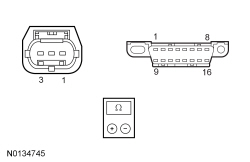 | Yes
GO to E4 . No REPAIR the circuit in question. | ||||||||||||||||
| E4 CHECK FOR CORRECT PSCM OPERATION | |||||||||||||||||
| Yes
CHECK OASIS for any applicable TSBs. If a TSB exists for this concern, discontinue this test and follow TSB instructions. If no TSBs address this concern, INSTALL a new PSCM . REFER to Section 211-04 . No The system is operating correctly at this time. The concern may have been caused by a loose or corroded connector. ADDRESS the root cause of any connector or pin issues. | ||||||||||||||||
Pinpoint Test F: The Restraints Control Module (RCM) Does Not Respond To The Scan Tool
Diagnostics in this manual assume a certain skill level and knowledge of Ford-specific diagnostic practices. Refer to Diagnostic Methods in Section 100-00 for information about these practices.
Refer to Wiring Diagrams Cell 14 , Module Communications Network for schematic and connector information.
Refer to Wiring Diagrams Cell 46 , Supplemental Restraint System for schematic and connector information.
The Restraints Control Module (RCM) communicates with the scan tool through the High Speed Controller Area Network (HS-CAN).
Verify BCM fuse 41 (7.5A) is OK.
 WARNING: Never probe the electrical connectors on airbag, Safety Canopy or side air curtain assemblies. Failure to follow this instruction may result in the accidental deployment of these assemblies, which increases the risk of serious personal injury or death.
 WARNING: Never disassemble or tamper with seat belt deployable components, including pretensioners, load limiters and inflators. Never back probe deployable device electrical connectors. Tampering or back probing may cause an accidental deployment and result in personal injury or death.
NOTE: Failure to disconnect the battery when instructed will result in false resistance readings. Refer to Section 414-01 .
NOTE: The Supplemental Restraint System (SRS) must be fully operational and free of faults before releasing the vehicle to the customer.
| Test Step | Result / Action to Take | ||||||||||||||||
|---|---|---|---|---|---|---|---|---|---|---|---|---|---|---|---|---|---|
| F1 CHECK THE RCM CONNECTION | |||||||||||||||||
| Yes
GO to F2 . No INSTALL a new wire harness. REPOWER the SRS . REFER to Section 501-20B . | ||||||||||||||||
| F2 CHECK THE RCM VOLTAGE SUPPLY CIRCUIT FOR AN OPEN | |||||||||||||||||
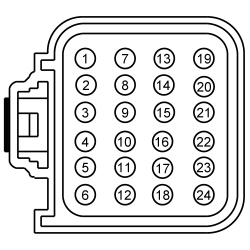 | Yes
GO to F3 . No VERIFY the BCM fuse 41 (7.5A) is OK. If OK, REPAIR the circuit. If not OK, REFER to the Wiring Diagrams manual to identify the possible causes of the circuit short. | ||||||||||||||||
| F3 CHECK THE RCM CASE GROUND | |||||||||||||||||
| Yes
GO to F4 . No REPAIR the RCM case ground as necessary. CONNECT the negative battery cable. | ||||||||||||||||
| F4 CHECK THE HS-CAN CIRCUITS BETWEEN THE RCM AND THE DLC FOR AN OPEN | |||||||||||||||||
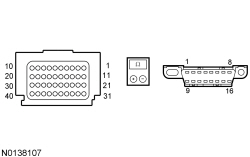 | Yes
CONNECT the negative battery cable. GO to F5 . No REPAIR the circuit in question. CONNECT the negative battery cable. | ||||||||||||||||
| F5 CHECK FOR CORRECT RCM OPERATION | |||||||||||||||||
| Yes
CHECK OASIS for any applicable TSBs. If a TSB exists for this concern, DISCONTINUE this test and FOLLOW TSB instructions. If no TSBs address this concern, INSTALL a new RCM . REFER to Section 501-20B . No The system is operating correctly at this time. The concern may have been caused by a loose or corroded connector. ADDRESS the root cause of any connector or pin issues. | ||||||||||||||||
Pinpoint Test G: The Occupant Classification System Module (OCSM) Does Not Communicate With the Scan Tool
Diagnostics in this manual assume a certain skill level and knowledge of Ford-specific diagnostic practices. Refer to Diagnostic Methods in Section 100-00 for information about these practices.
Refer to Wiring Diagrams Cell 14 , Module Communications Network for schematic and connector information.
Refer to Wiring Diagrams Cell 46 , Supplemental Restraint System for schematic and connector information.
The Occupant Classification System Module (OCSM) communicates with the scan tool through the High Speed Controller Area Network (HS-CAN).
Verify BCM fuse 41 (7.5A) is OK.
NOTE: Failure to disconnect the battery when instructed will result in false resistance readings. Refer to Section 414-01 .
| Test Step | Result / Action to Take | ||||||||||||||||
|---|---|---|---|---|---|---|---|---|---|---|---|---|---|---|---|---|---|
| G1 CHECK THE OCSM VOLTAGE SUPPLY CIRCUITS FOR AN OPEN | |||||||||||||||||
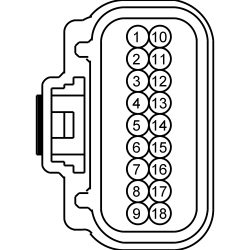 | Yes
GO to G2 . No VERIFY the BCM fuse 41 (7.5A) is OK. If OK, REPAIR the circuit. If not OK, REFER to the Wiring Diagrams manual to identify the possible causes of the circuit short. | ||||||||||||||||
| G2 CHECK THE OCSM GROUND CIRCUIT FOR AN OPEN | |||||||||||||||||
 | Yes
GO to G3 . No REPAIR the circuit in question. | ||||||||||||||||
| G3 CHECK THE HS-CAN CIRCUITS BETWEEN THE OCSM AND THE DLC FOR AN OPEN | |||||||||||||||||
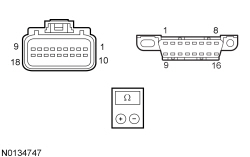 | Yes
CONNECT the negative battery cable. GO to G4 . No REPAIR the circuit in question. | ||||||||||||||||
| G4 CHECK FOR CORRECT OCSM OPERATION | |||||||||||||||||
| Yes
CHECK OASIS for any applicable TSBs. If a TSB exists for this concern, DISCONTINUE this test and FOLLOW TSB instructions. If no TSBs address this concern, INSTALL a new OCSM . REFER to Section 501-20B . No The system is operating correctly at this time. The concern may have been caused by a loose or corroded connector. ADDRESS the root cause of any connector or pin issues. | ||||||||||||||||
Pinpoint Test H: The Head Up Display (HUD) Module Does Not Respond To The Scan Tool
Diagnostics in this manual assume a certain skill level and knowledge of Ford-specific diagnostic practices. Refer to Diagnostic Methods in Section 100-00 for information about these practices.
Refer to Wiring Diagrams Cell 14 , Module Communications Network for schematic and connector information.
Refer to Wiring Diagrams Cell 136 , Vehicle Emergency Messaging System for schematic and connector information.
The Head Up Display (HUD) module communicates with the scan tool through the High Speed Controller Area Network (HS-CAN).
Verify BCM fuse 11 (10A) or fuse 35 (5A) is OK.
NOTE: Failure to disconnect the battery when instructed will result in false resistance readings. Refer to Section 414-01 .
| Test Step | Result / Action to Take | ||||||||||||||||
|---|---|---|---|---|---|---|---|---|---|---|---|---|---|---|---|---|---|
| H1 CHECK THE HUD MODULE VOLTAGE SUPPLY CIRCUITS FOR AN OPEN | |||||||||||||||||
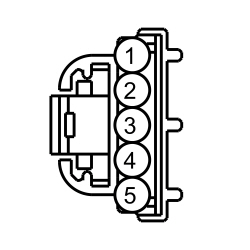 | Yes
GO to H2 . No VERIFY Body Control Module (BCM) fuse 11 (10A) or fuse 35 (5A) is OK. If OK, REPAIR the circuit in question. If not OK, REFER to the Wiring Diagrams manual to identify the possible causes of the circuit short. | ||||||||||||||||
| H2 CHECK THE HUD MODULE GROUND CIRCUIT FOR AN OPEN | |||||||||||||||||
 | Yes
GO to H3 . No REPAIR the circuit in question. | ||||||||||||||||
| H3 CHECK THE HS-CAN CIRCUITS BETWEEN THE HUD MODULE AND THE DLC FOR AN OPEN | |||||||||||||||||
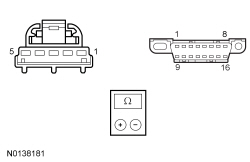 | Yes
CONNECT the negative battery cable. GO to H4 . No REPAIR the circuit in question. | ||||||||||||||||
| H4 CHECK FOR CORRECT HUD MODULE OPERATION | |||||||||||||||||
| Yes
CHECK OASIS for any applicable TSBs. If a TSB exists for this concern, discontinue this test and follow TSB instructions. If no TSBs address this concern, INSTALL a new HUD module. REFER to Section 419-03C . No The system is operating correctly at this time. The concern may have been caused by a loose or corroded connector. ADDRESS the root cause of any connector or pin issues. | ||||||||||||||||
Pinpoint Test I: The Steering Column Control Module (SCCM) Does Not Respond To The Scan Tool
Diagnostics in this manual assume a certain skill level and knowledge of Ford-specific diagnostic practices. Refer to Diagnostic Methods in Section 100-00 for information about these practices.
Refer to Wiring Diagrams Cell 14 , Module Communications Network for schematic and connector information.
Refer to Wiring Diagrams Cell 90 , Turn Signal/Stop/Hazard Lamps for schematic and connector information.
The Steering Column Control Module (SCCM) communicates with the scan tool through the High Speed Controller Area Network (HS-CAN).
Verify BCM fuse 23 (15A) or fuse 24 (15A) is OK.
NOTE: Failure to disconnect the battery when instructed results in false resistance readings. Refer to Section 414-01 .
| Test Step | Result / Action to Take | ||||||||||||||||||||||||
|---|---|---|---|---|---|---|---|---|---|---|---|---|---|---|---|---|---|---|---|---|---|---|---|---|---|
| I1 CHECK THE SCCM VOLTAGE SUPPLY CIRCUITS FOR AN OPEN | |||||||||||||||||||||||||

 | Yes
GO to I2 . No VERIFY the Body Control Module (BCM) fuses 23 (15A) and 24 (15A) are OK. If OK, REPAIR the circuit in question. If not OK, REFER to the Wiring Diagrams manual to identify the possible causes of the circuit short. | ||||||||||||||||||||||||
| I2 CHECK THE SCCM GROUND CIRCUITS FOR AN OPEN | |||||||||||||||||||||||||

 | Yes
GO to I3 . No REPAIR the circuit in question. | ||||||||||||||||||||||||
| I3 CHECK THE HS-CAN CIRCUITS BETWEEN THE SCCM AND THE DLC FOR AN OPEN | |||||||||||||||||||||||||
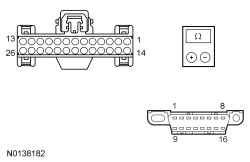 | Yes
CONNECT the negative battery cable. GO to I4 . No REPAIR the circuit in question. | ||||||||||||||||||||||||
| I4 CHECK FOR CORRECT SCCM OPERATION | |||||||||||||||||||||||||
| Yes
CHECK OASIS for any applicable TSBs. If a TSB exists for this concern, discontinue this test and follow TSB instructions. If no TSBs address this concern, INSTALL a new SCCM . REFER to Section 211-05 . No The system is operating correctly at this time. The concern may have been caused by a loose or corroded connector. ADDRESS the root cause of any connector or pin issues. | ||||||||||||||||||||||||
Pinpoint Test J: The Cruise-Control Module (C-CM) Does Not Communicate With the Scan Tool
Diagnostics in this manual assume a certain skill level and knowledge of Ford-specific diagnostic practices. Refer to Diagnostic Methods in Section 100-00 for information about these practices.
Refer to Wiring Diagrams Cell 14 , Module Communications Network for schematic and connector information.
Refer to Wiring Diagrams Cell 31 , Cruise Control for schematic and connector information.
The Cruise-Control Module (C-CM) communicates with the scan tool through the HS-CAN .
Verify BJB fuse 79 (10A) or fuse 91 (10A) is OK.
NOTE: Failure to disconnect the battery when instructed will result in false resistance readings. Refer to Section 414-01 .
| Test Step | Result / Action to Take | ||||||||||||||||
|---|---|---|---|---|---|---|---|---|---|---|---|---|---|---|---|---|---|
| J1 CHECK THE C-CM VOLTAGE SUPPLY CIRCUITS FOR AN OPEN | |||||||||||||||||
 | Yes
GO to J2 . No VERIFY the Battery Junction Box (BJB) fuse 79 (10A) or fuse 91 (10A) is OK. If OK, REPAIR the circuit. If not OK, REFER to the Wiring Diagrams manual to identify the possible causes of the circuit short. | ||||||||||||||||
| J2 CHECK THE C-CM GROUND CIRCUIT FOR AN OPEN | |||||||||||||||||
 | Yes
GO to J3 . No REPAIR the circuit in question. | ||||||||||||||||
| J3 CHECK THE HS-CAN CIRCUITS BETWEEN THE C-CM AND THE DLC FOR AN OPEN | |||||||||||||||||
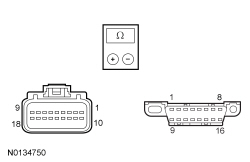 | Yes
GO to J4 . No REPAIR the circuit in question. | ||||||||||||||||
| J4 CHECK FOR CORRECT C-CM OPERATION | |||||||||||||||||
| Yes
CHECK OASIS for any applicable TSBs. If a TSB exists for this concern, discontinue this test and follow TSB instructions. If no TSBs address this concern, INSTALL a new C-CM . REFER to Section 419-03B . No The system is operating correctly at this time. The concern may have been caused by a loose or corroded connector. ADDRESS the root cause of any connector or pin issues. | ||||||||||||||||
Pinpoint Test K: The Parking Aid Module (PAM) Does Not Respond To The Scan Tool
Diagnostics in this manual assume a certain skill level and knowledge of Ford-specific diagnostic practices. Refer to Diagnostic Methods in Section 100-00 for information about these practices.
Refer to Wiring Diagrams Cell 14 , Module Communications Network for schematic and connector information.
Refer to Wiring Diagrams Cell 131 , Parking Aid for schematic and connector information.
The Parking Aid Module (PAM) communicates with the scan tool through the High Speed Controller Area Network (HS-CAN).
Verify BCM fuse 34 (10A) is OK.
NOTE: Failure to disconnect the battery when instructed will result in false resistance readings. Refer to Section 414-01 .
| Test Step | Result / Action to Take | ||||||||||||||||
|---|---|---|---|---|---|---|---|---|---|---|---|---|---|---|---|---|---|
| K1 CHECK THE PAM VOLTAGE SUPPLY CIRCUIT FOR AN OPEN | |||||||||||||||||
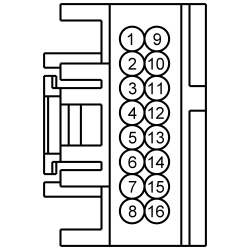 | Yes
GO to K2 . No VERIFY the Body Control Module (BCM) fuse 34 (10A) is OK. If OK, REPAIR the circuit. If not OK, REFER to the Wiring Diagrams manual to identify the possible causes of the circuit short. | ||||||||||||||||
| K2 CHECK THE PAM GROUND CIRCUIT FOR AN OPEN | |||||||||||||||||
 | Yes
GO to K3 . No REPAIR the circuit in question. | ||||||||||||||||
| K3 CHECK THE HS-CAN CIRCUITS BETWEEN THE PAM AND THE DLC FOR AN OPEN | |||||||||||||||||
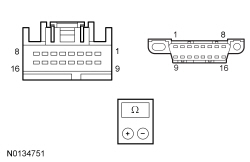 | Yes
GO to K4 . No REPAIR the circuit in question. | ||||||||||||||||
| K4 CHECK FOR CORRECT PAM OPERATION | |||||||||||||||||
| Yes
CHECK OASIS for any applicable TSBs. If a TSB exists for this concern, discontinue this test and follow TSB instructions. If no TSBs address this concern, INSTALL a new PAM . REFER to Section 413-13A . No The system is operating correctly at this time. The concern may have been caused by a loose or corroded connector. ADDRESS the root cause of any connector or pin issues. | ||||||||||||||||
Pinpoint Test L: The Remote Function Actuator (RFA) Module Does Not Respond To The Scan Tool
Diagnostics in this manual assume a certain skill level and knowledge of Ford-specific diagnostic practices. Refer to Diagnostic Methods in Section 100-00 for information about these practices.
Refer to Wiring Diagrams Cell 14 , Module Communications Network for schematic and connector information.
Refer to Wiring Diagrams Cell 117 , Remote Keyless Entry and Alarm for schematic and connector information.
The Remote Function Actuator (RFA) module communicates with the scan tool through the Medium Speed Controller Area Network (MS-CAN).
Verify BCM fuse 11 (10A) or fuse 27 (20A)
NOTICE: Use the correct probe adapter(s) when making measurements. Failure to use the correct probe adapter(s) may damage the connector.
NOTE: Failure to disconnect the battery when instructed will result in false resistance readings. Refer to Section 414-01 .
| Test Step | Result / Action to Take | ||||||||||||||||||||
|---|---|---|---|---|---|---|---|---|---|---|---|---|---|---|---|---|---|---|---|---|---|
| L1 CHECK THE RFA MODULE VOLTAGE SUPPLY CIRCUIT FOR AN OPEN | |||||||||||||||||||||
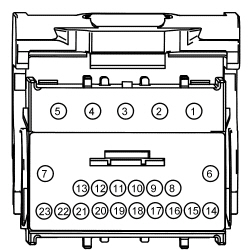 | Yes
GO to L2 . No VERIFY the Body Control Module (BCM) fuse 11 (10A) or fuse 27 (20A) is OK. If OK, REPAIR the circuit. If not OK, REFER to the Wiring Diagrams manual to identify the possible causes of the circuit short. | ||||||||||||||||||||
| L2 CHECK THE RFA MODULE GROUND CIRCUIT FOR AN OPEN | |||||||||||||||||||||
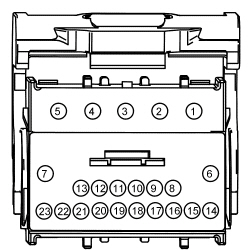 | Yes
GO to L3 . No REPAIR the circuit in question. | ||||||||||||||||||||
| L3 CHECK THE MS-CAN CIRCUITS BETWEEN THE RFA MODULE AND THE DLC FOR AN OPEN | |||||||||||||||||||||
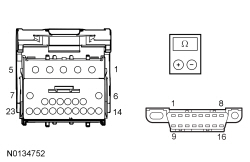 | Yes
GO to L4 . No REPAIR the circuit in question. | ||||||||||||||||||||
| L4 CHECK FOR CORRECT RFA MODULE OPERATION | |||||||||||||||||||||
| Yes
CHECK OASIS for any applicable TSBs. If a TSB exists for this concern, discontinue this test and follow TSB instructions. If no TSBs address this concern, INSTALL a new RFA module. REFER to Section 419-10 . No The system is operating correctly at this time. The concern may have been caused by a loose or corroded connector. ADDRESS the root cause of any connector or pin issues. | ||||||||||||||||||||
Pinpoint Test M: The Accessory Protocol Interface Module (APIM) Does Not Respond To The Scan Tool
Diagnostics in this manual assume a certain skill level and knowledge of Ford-specific diagnostic practices. Refer to Diagnostic Methods in Section 100-00 for information about these practices.
Refer to Wiring Diagrams Cell 14 , Module Communications Network for schematic and connector information.
Refer to Wiring Diagrams Cell 130 , Audio System/Navigation for schematic and connector information.
The Accessory Protocol Interface Module (APIM) communicates with the scan tool and other network modules on the High Speed Controller Area Network (HS-CAN). The APIM also communicates with other network modules on the Medium Speed Controller Area Network (MS-CAN) and the Infotainment Controller Area Network (I-CAN) with an 8-inch touchscreen.
Verify BCM fuse 9 (10A) is OK.
NOTE: Failure to disconnect the battery when instructed will result in false resistance readings. Refer to Section 414-01 .
| Test Step | Result / Action to Take | ||||||||||||||||||||||||||||||||
|---|---|---|---|---|---|---|---|---|---|---|---|---|---|---|---|---|---|---|---|---|---|---|---|---|---|---|---|---|---|---|---|---|---|
| M1 CHECK THE APIM VOLTAGE SUPPLY CIRCUIT FOR AN OPEN | |||||||||||||||||||||||||||||||||
4.2-Inch Display
8-Inch Display
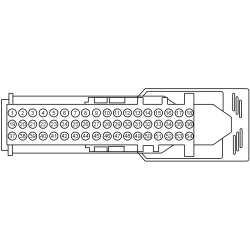 | Yes
GO to M2 . No VERIFY the Body Control Module (BCM) fuse 9 (10A) is OK. If OK, REPAIR the circuit in question. If not OK, REFER to the Wiring Diagrams manual to identify the possible causes of the circuit short. | ||||||||||||||||||||||||||||||||
| M2 CHECK THE APIM GROUND CIRCUITS FOR AN OPEN | |||||||||||||||||||||||||||||||||
4.2-Inch Display
8-Inch Display
 | Yes
GO to M3 . No REPAIR the circuit in question. | ||||||||||||||||||||||||||||||||
| M3 CHECK THE HS-CAN CIRCUITS BETWEEN THE APIM AND THE DLC FOR AN OPEN | |||||||||||||||||||||||||||||||||
4.2-Inch Display
8-Inch Display
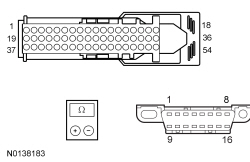 | Yes
GO to M4 . No REPAIR the circuit in question. | ||||||||||||||||||||||||||||||||
| M4 CHECK THE I-CAN CIRCUITS BETWEEN THE APIM AND THE DLC FOR AN OPEN | |||||||||||||||||||||||||||||||||
4.2-Inch Display
8-Inch Display
 | Yes
If the vehicle is equipped with an 8-inch touchscreen, GO to M5 . If the vehicle is not equipped with an 8-inch touchscreen, GO to M6 . No REPAIR the circuit in question. | ||||||||||||||||||||||||||||||||
| M5 CHECK THE MS-CAN CIRCUITS BETWEEN THE APIM AND THE DLC FOR AN OPEN | |||||||||||||||||||||||||||||||||
 | Yes
GO to M6 . No REPAIR the circuit in question. | ||||||||||||||||||||||||||||||||
| M6 CHECK FOR CORRECT APIM OPERATION | |||||||||||||||||||||||||||||||||
| Yes
CHECK OASIS for any applicable TSBs. If a TSB exists for this concern, DISCONTINUE this test and FOLLOW TSB instructions. If no TSBs address this concern, For diagnosing and testing please refer to the on-line Workshop Manual. If you do not have an on-line subscription, go to www.motorcraftservice.com. No The system is operating correctly at this time. The concern may have been caused by a loose or corroded connector. ADDRESS the root cause of any connector or pin issues. | ||||||||||||||||||||||||||||||||
Pinpoint Test N: The Audio Front Control Module (ACM) Does Not Respond To The Scan Tool
Diagnostics in this manual assume a certain skill level and knowledge of Ford-specific diagnostic practices. Refer to Diagnostic Methods in Section 100-00 for information about these practices.
Refer to Wiring Diagrams Cell 14 , Module Communications Network for schematic and connector information.
Refer to Wiring Diagrams Cell 130 , Audio System/Navigation for schematic and connector information.
The Audio Front Control Module (ACM) communicates with the scan tool through the High Speed Controller Area Network (HS-CAN). The IPC is used as the gateway module.
Verify BCM fuse 29 (20A) is OK.
NOTE: Failure to disconnect the battery when instructed will result in false resistance readings. Refer to Section 414-01 .
| Test Step | Result / Action to Take | ||||||||||||||||
|---|---|---|---|---|---|---|---|---|---|---|---|---|---|---|---|---|---|
| N1 CHECK THE I-CAN TERMINATION RESISTANCE | |||||||||||||||||
 | Yes
GO to N3 . No GO to N2 . | ||||||||||||||||
| N2 CHECK THE I-CAN CIRCUITS BETWEEN THE ACM AND THE DLC FOR AN OPEN | |||||||||||||||||
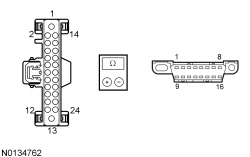 | Yes
GO to N3 . No REPAIR the circuit. | ||||||||||||||||
| N3 CHECK THE ACM VOLTAGE SUPPLY CIRCUIT FOR AN OPEN | |||||||||||||||||
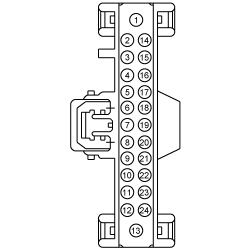 | Yes
GO to N4 . No VERIFY the Body Control Module (BCM) fuse 29 (20A) is OK. If OK, REPAIR the circuit. If not OK, REFER to the Wiring Diagrams manual to identify the possible causes of the circuit short. | ||||||||||||||||
| N4 CHECK THE ACM GROUND CIRCUIT FOR AN OPEN | |||||||||||||||||
 | Yes
GO to N5 . No REPAIR the circuit. | ||||||||||||||||
| N5 CHECK FOR CORRECT ACM OPERATION | |||||||||||||||||
| Yes
CHECK OASIS for any applicable TSBs. If a TSB exists for this concern, discontinue this test and follow TSB instructions. If no TSBs address this concern, INSTALL a new ACM . Refer to the appropriate section in Group 415 for the procedure. No The system is operating correctly at this time. The concern may have been caused by a loose or corroded connector. ADDRESS the root cause of any connector or pin issues. | ||||||||||||||||
Pinpoint Test O: The Front Controls Interface Module (FCIM) Does Not Respond To The Scan Tool
Diagnostics in this manual assume a certain skill level and knowledge of Ford-specific diagnostic practices. Refer to Diagnostic Methods in Section 100-00 for information about these practices.
Refer to Wiring Diagrams Cell 14 , Module Communications Network for schematic and connector information.
Refer to Wiring Diagrams Cell 130 , Audio System/Navigation for schematic and connector information.
The Front Controls Interface Module (FCIM) communicates with the scan tool through the High Speed Controller Area Network (HS-CAN). The IPC is used as a gateway module.
Verify BCM fuse 9 (10A) is OK.
NOTE: Failure to disconnect the battery when instructed will result in false resistance readings. Refer to Section 414-01 .
| Test Step | Result / Action to Take | ||||||||||||||||
|---|---|---|---|---|---|---|---|---|---|---|---|---|---|---|---|---|---|
| O1 CHECK THE FCIM VOLTAGE SUPPLY CIRCUIT FOR AN OPEN | |||||||||||||||||
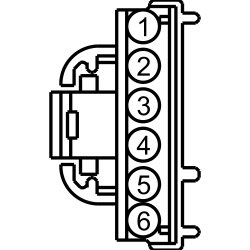 | Yes
GO to O2 . No VERIFY the Body Control Module (BCM) fuse 9 (10A) is OK. If OK, REPAIR the circuit in question. If not OK, REFER to the Wiring Diagrams manual to identify the possible causes of the circuit short. | ||||||||||||||||
| O2 CHECK THE FCIM GROUND CIRCUIT FOR AN OPEN | |||||||||||||||||
 | Yes
GO to O3 . No REPAIR the circuit in question. | ||||||||||||||||
| O3 CHECK THE I-CAN CIRCUITS BETWEEN THE FCIM AND THE DLC FOR AN OPEN | |||||||||||||||||
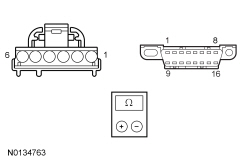 | Yes
GO to O4 . No REPAIR the circuit in question. | ||||||||||||||||
| O4 CHECK FOR CORRECT FCIM OPERATION | |||||||||||||||||
| Yes
CHECK OASIS for any applicable TSBs. If a TSB exists for this concern, discontinue this test and follow TSB instructions. If no TSBs address this concern, INSTALL a new FCIM . Refer to the appropriate section in Group 415 for the procedure. No The system is operating correctly at this time. The concern may have been caused by a loose or corroded connector. ADDRESS the root cause of any connector or pin issues. | ||||||||||||||||
Pinpoint Test P: The Front Control/Display Interface Module (FCDIM) Does Not Respond To The Scan Tool
Diagnostics in this manual assume a certain skill level and knowledge of Ford-specific diagnostic practices. Refer to Diagnostic Methods in Section 100-00 for information about these practices.
Refer to Wiring Diagrams Cell 14 , Module Communications Network for schematic and connector information.
Refer to Wiring Diagrams Cell 130 , Audio System/Navigation for schematic and connector information.
The Front Control/Display Interface Module (FCDIM) communicates with the scan tool through the High Speed Controller Area Network (HS-CAN). The IPC is used as the gateway module.
Verify BCM fuse 9 (10A) is OK.
NOTE: Failure to disconnect the battery when instructed will result in false resistance readings. Refer to Section 414-01 .
| Test Step | Result / Action to Take | ||||||||||||||||
|---|---|---|---|---|---|---|---|---|---|---|---|---|---|---|---|---|---|
| P1 CHECK THE FCDIM VOLTAGE SUPPLY CIRCUIT FOR AN OPEN | |||||||||||||||||
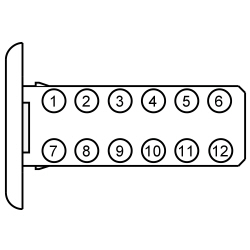 | Yes
GO to P2 . No VERIFY the Body Control Module (BCM) fuse 9 (10A) is OK. If OK, REPAIR the circuit. If not OK, REFER to the Wiring Diagrams manual to identify the possible causes of the circuit short. | ||||||||||||||||
| P2 CHECK THE FCDIM GROUND CIRCUIT FOR AN OPEN | |||||||||||||||||
 | Yes
GO to P3 . No REPAIR the circuit in question. | ||||||||||||||||
| P3 CHECK THE I-CAN CIRCUITS BETWEEN THE FCDIM AND THE DLC FOR AN OPEN | |||||||||||||||||
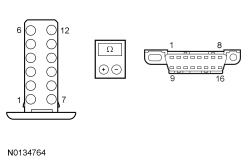 | Yes
CONNECT the negative battery cable. GO to P4 . No REPAIR the circuit in question. CONNECT the negative battery cable. | ||||||||||||||||
| P4 CHECK FOR CORRECT FCDIM OPERATION | |||||||||||||||||
| Yes
CHECK OASIS for any applicable TSBs. If a TSB exists for this concern, discontinue this test and follow TSB instructions. If no TSBs address this concern, INSTALL a new FCDIM . Refer to the appropriate section in Group 415 for the procedure. No The system is operating correctly at this time. The concern may have been caused by a loose or corroded connector. ADDRESS the root cause of any connector or pin issues. | ||||||||||||||||
Pinpoint Test Q: The Global Positioning System Module (GPSM) Does Not Respond To The Scan Tool
Diagnostics in this manual assume a certain skill level and knowledge of Ford-specific diagnostic practices. Refer to Diagnostic Methods in Section 100-00 for information about these practices.
Refer to Wiring Diagrams Cell 14 , Module Communications Network for schematic and connector information.
Refer to Wiring Diagrams Cell 130 , Audio System/Navigation for schematic and connector information.
The Global Positioning System Module (GPSM) communicates with the scan tool through the Medium Speed Controller Area Network (MS-CAN).
Verify BCM fuse 29 (20A) is OK.
NOTE: Failure to disconnect the battery when instructed will result in false resistance readings. Refer to Section 414-01 .
| Test Step | Result / Action to Take | ||||||||||||||||
|---|---|---|---|---|---|---|---|---|---|---|---|---|---|---|---|---|---|
| Q1 CHECK THE GPSM VOLTAGE SUPPLY CIRCUIT FOR AN OPEN | |||||||||||||||||
 | Yes
GO to Q2 . No VERIFY the Body Control Module (BCM) fuse 29 (20A) is OK. If OK, REPAIR the circuit in question. If not OK, REFER to the Wiring Diagrams manual to identify the possible causes of the circuit short. | ||||||||||||||||
| Q2 CHECK THE GPSM GROUND CIRCUIT FOR AN OPEN | |||||||||||||||||
 | Yes
GO to Q3 . No REPAIR the circuit in question. | ||||||||||||||||
| Q3 CHECK THE MS-CAN CIRCUITS BETWEEN THE GPSM AND THE DLC FOR AN OPEN | |||||||||||||||||
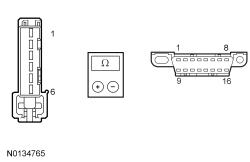 | Yes
GO to Q4 . No REPAIR the circuit in question. | ||||||||||||||||
| Q4 CHECK FOR CORRECT GPSM OPERATION | |||||||||||||||||
| Yes
CHECK OASIS for any applicable TSBs. If a TSB exists for this concern, discontinue this test and follow TSB instructions. If no TSBs address this concern, INSTALL a new GPSM . Refer to the appropriate section in Group 415 for the procedure. No The system is operating correctly at this time. The concern may have been caused by a loose or corroded connector. ADDRESS the root cause of any connector or pin issues. | ||||||||||||||||
Pinpoint Test R: The Tire Pressure Monitor (TPM) Module Does Not Respond To The Scan Tool
Diagnostics in this manual assume a certain skill level and knowledge of Ford-specific diagnostic practices. Refer to Diagnostic Methods in Section 100-00 for information about these practices.
Refer to Wiring Diagrams Cell 14 , Module Communications Network for schematic and connector information.
Refer to Wiring Diagrams Cell 118 , Tire Pressure Monitor System for schematic and connector information.
The Tire Pressure Monitor (TPM) module communicates with the scan tool through the Medium Speed Controller Area Network (MS-CAN).
Verify Body Control Module (BCM) fuse 9 (10A) is OK.
NOTE: Failure to disconnect the battery when instructed results in false resistance readings. Refer to Section 414-01 .
| Test Step | Result / Action to Take | ||||||||||||||||
|---|---|---|---|---|---|---|---|---|---|---|---|---|---|---|---|---|---|
| R1 CHECK THE TPM MODULE VOLTAGE SUPPLY CIRCUIT FOR AN OPEN | |||||||||||||||||
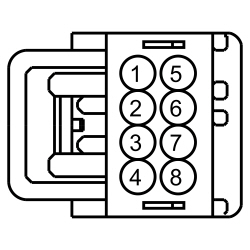 | Yes
GO to R2 . No VERIFY the Body Control Module (BCM) fuse 9 (10A) is OK. If OK, REPAIR the circuit. If not OK, REFER to the Wiring Diagrams manual to identify the possible causes of the circuit short. | ||||||||||||||||
| R2 CHECK THE TPM MODULE GROUND CIRCUIT FOR AN OPEN | |||||||||||||||||
 | Yes
GO to R3 . No REPAIR the circuit in question. | ||||||||||||||||
| R3 CHECK THE MS-CAN CIRCUITS BETWEEN THE TPM MODULE AND THE DLC FOR AN OPEN | |||||||||||||||||
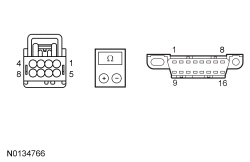 | Yes
GO to R4 . No REPAIR the circuit in question. | ||||||||||||||||
| R4 CHECK FOR CORRECT TPM MODULE OPERATION | |||||||||||||||||
| Yes
CHECK OASIS for any applicable TSBs. If a TSB exists for this concern, discontinue this test and follow TSB instructions. If no TSBs address this concern, INSTALL a new TPM module. REFER to Section 204-04 . No The system is operating correctly at this time. The concern may have been caused by a loose or corroded connector. ADDRESS the root cause of any connector or pin issues. | ||||||||||||||||
Pinpoint Test S: The Side Obstacle Detection Control Module - Left (SOD-L) Does Not Respond To The Scan Tool
Diagnostics in this manual assume a certain skill level and knowledge of Ford-specific diagnostic practices. Refer to Diagnostic Methods in Section 100-00 for information about these practices.
Refer to Wiring Diagrams Cell 14 , Module Communications Network for schematic and connector information.
Refer to Wiring Diagrams Cell 136 , Vehicle Emergency Messaging System for schematic and connector information.
The Side Obstacle Detection Control Module - Left (SOD-L) communicates with the scan tool through the Medium Speed Controller Area Network (MS-CAN).
Verify BCM fuse 34 (10A) is OK.
NOTE: Failure to disconnect the battery when instructed will result in false resistance readings. Refer to Section 414-01 .
| Test Step | Result / Action to Take | ||||||||||||||||
|---|---|---|---|---|---|---|---|---|---|---|---|---|---|---|---|---|---|
| S1 CHECK THE SOD-L VOLTAGE SUPPLY CIRCUIT FOR AN OPEN | |||||||||||||||||
 | Yes
GO to S2 . No VERIFY the Body Control Module (BCM) fuse 34 (10A) is OK. If OK, REPAIR the circuit in question. If not OK, REFER to the Wiring Diagrams manual to identify the possible causes of the circuit short. | ||||||||||||||||
| S2 CHECK THE SOD-L GROUND CIRCUIT FOR AN OPEN | |||||||||||||||||
 | Yes
GO to S3 . No REPAIR the circuit in question. | ||||||||||||||||
| S3 CHECK THE MS-CAN CIRCUITS BETWEEN THE SOD-L AND THE DLC FOR AN OPEN | |||||||||||||||||
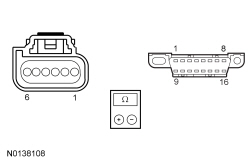 | Yes
GO to S4 . No REPAIR the circuit in question. | ||||||||||||||||
| S4 CHECK FOR CORRECT SOD-L OPERATION | |||||||||||||||||
| Yes
CHECK OASIS for any applicable TSBs. If a TSB exists for this concern, discontinue this test and follow TSB instructions. If no TSBs address this concern, INSTALL a new SOD-L . REFER to Section 419-04 . No The system is operating correctly at this time. The concern may have been caused by a loose or corroded connector. ADDRESS the root cause of any connector or pin issues. | ||||||||||||||||
Pinpoint Test T: The Side Obstacle Detection Control Module - Right (SOD-R) Does Not Respond To The Scan Tool
Diagnostics in this manual assume a certain skill level and knowledge of Ford-specific diagnostic practices. Refer to Diagnostic Methods in Section 100-00 for information about these practices.
Refer to Wiring Diagrams Cell 14 , Module Communications Network for schematic and connector information.
Refer to Wiring Diagrams Cell 136 , Vehicle Emergency Messaging System for schematic and connector information.
The Side Obstacle Detection Control Module - Right (SOD-R) communicates with the scan tool through the Medium Speed Controller Area Network (MS-CAN).
Verify BCM fuse 34 (10A) is OK.
NOTE: Failure to disconnect the battery when instructed will result in false resistance readings. Refer to Section 414-01 .
| Test Step | Result / Action to Take | ||||||||||||||||
|---|---|---|---|---|---|---|---|---|---|---|---|---|---|---|---|---|---|
| T1 CHECK THE SOD-R VOLTAGE SUPPLY CIRCUIT FOR AN OPEN | |||||||||||||||||
 | Yes
GO to T2 . No VERIFY the Body Control Module (BCM) fuse 34 (10A) is OK. If OK, REPAIR the circuit in question. If not OK, REFER to the Wiring Diagrams manual to identify the possible causes of the circuit short. | ||||||||||||||||
| T2 CHECK THE SOD-R GROUND CIRCUIT FOR AN OPEN | |||||||||||||||||
 | Yes
GO to T3 . No REPAIR the circuit in question. | ||||||||||||||||
| T3 CHECK THE MS-CAN CIRCUITS BETWEEN THE SOD-R AND THE DLC FOR AN OPEN | |||||||||||||||||
 | Yes
GO to T4 . No REPAIR the circuit in question. | ||||||||||||||||
| T4 CHECK FOR CORRECT SOD-R OPERATION | |||||||||||||||||
| Yes
CHECK OASIS for any applicable TSBs. If a TSB exists for this concern, discontinue this test and follow TSB instructions. If no TSBs address this concern, INSTALL a new SOD-R . REFER to Section 419-04 . No The system is operating correctly at this time. The concern may have been caused by a loose or corroded connector. ADDRESS the root cause of any connector or pin issues. | ||||||||||||||||
Pinpoint Test U: The Driver Seat Module (DSM) Does Not Respond To The Scan Tool
Diagnostics in this manual assume a certain skill level and knowledge of Ford-specific diagnostic practices. Refer to Diagnostic Methods in Section 100-00 for information about these practices.
Refer to Wiring Diagrams Cell 14 , Module Communications Network for schematic and connector information.
Refer to Wiring Diagrams Cell 123 , Memory Seats for schematic and connector information.
The Driver Seat Module (DSM) communicates with the scan tool through the Medium Speed Controller Area Network (MS-CAN).
Verify Battery Junction Box (BJB) fuse 23 (30A) or Body Control Module (BCM) fuse 7 (7.5A) is OK.
NOTE: Failure to disconnect the battery when instructed will result in false resistance readings. Refer to Section 414-01 .
| Test Step | Result / Action to Take | ||||||||||||||||||||||||
|---|---|---|---|---|---|---|---|---|---|---|---|---|---|---|---|---|---|---|---|---|---|---|---|---|---|
| U1 CHECK THE DSM VOLTAGE SUPPLY CIRCUITS FOR AN OPEN | |||||||||||||||||||||||||
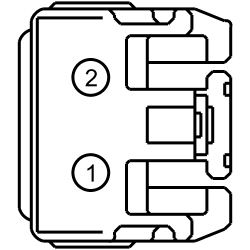
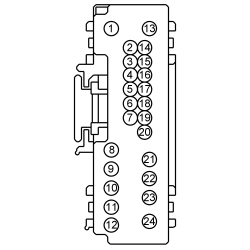 | Yes
GO to U2 . No VERIFY the Battery Junction Box (BJB) fuse 23 (30A) or the Body Control Module (BCM) fuse 7 (7.5A) is OK. If OK, REPAIR the circuit in question. If not OK, REFER to the Wiring Diagrams manual to identify the possible causes of the circuit short. | ||||||||||||||||||||||||
| U2 CHECK THE DSM GROUND CIRCUITS FOR AN OPEN | |||||||||||||||||||||||||

 | Yes
GO to U3 . No REPAIR the circuit in question. | ||||||||||||||||||||||||
| U3 CHECK THE MS-CAN CIRCUITS BETWEEN THE DSM AND THE DLC FOR AN OPEN | |||||||||||||||||||||||||
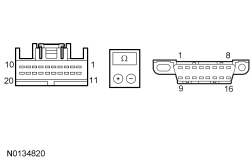 | Yes
GO to U4 . No REPAIR the circuit in question. | ||||||||||||||||||||||||
| U4 CHECK FOR CORRECT DSM OPERATION | |||||||||||||||||||||||||
| Yes
CHECK OASIS for any applicable TSBs. If a TSB exists for this concern, discontinue this test and follow TSB instructions. If no TSBs address this concern, INSTALL a new DSM . REFER to Section 501-10 . No The system is operating correctly at this time. The concern may have been caused by a loose or corroded connector. ADDRESS the root cause of any connector or pin issues. | ||||||||||||||||||||||||
Pinpoint Test V: The HVAC Module Does Not Respond To The Scan Tool
Diagnostics in this manual assume a certain skill level and knowledge of Ford-specific diagnostic practices. Refer to Diagnostic Methods in Section 100-00 for information about these practices.
Refer to Wiring Diagrams Cell 14 , Module Communications Network for schematic and connector information.
Refer to Wiring Diagrams Cell 54 , Manual Climate Control System for schematic and connector information.
Refer to Wiring Diagrams Cell 55 , Automatic Climate Control System for schematic and connector information.
The HVAC module communicates with the scan tool through the Medium Speed Controller Area Network (MS-CAN).
Verify BCM fuse 46 (10A) or BJB fuse 29 (20A) is OK
NOTE: Failure to disconnect the battery when instructed will result in false resistance readings. Refer to Section 414-01 .
| Test Step | Result / Action to Take | ||||||||||||||||||||||||||||||||||||||||||||
|---|---|---|---|---|---|---|---|---|---|---|---|---|---|---|---|---|---|---|---|---|---|---|---|---|---|---|---|---|---|---|---|---|---|---|---|---|---|---|---|---|---|---|---|---|---|
| V1 CHECK THE MS-CAN TERMINATION RESISTANCE | |||||||||||||||||||||||||||||||||||||||||||||
 | Yes
GO to V3 . No GO to V2 . | ||||||||||||||||||||||||||||||||||||||||||||
| V2 CHECK THE MS-CAN CIRCUITS BETWEEN THE HVAC MODULE AND THE DLC FOR AN OPEN | |||||||||||||||||||||||||||||||||||||||||||||
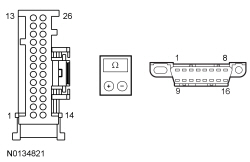 | Yes
GO to V5 . No REPAIR the circuit in question. | ||||||||||||||||||||||||||||||||||||||||||||
| V3 CHECK THE HVAC MODULE VOLTAGE SUPPLY CIRCUIT FOR AN OPEN | |||||||||||||||||||||||||||||||||||||||||||||
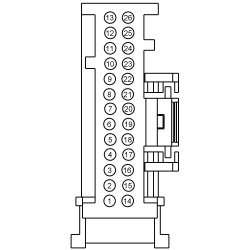
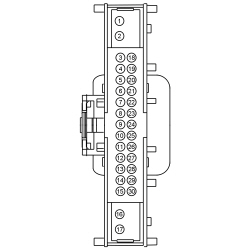 | Yes
GO to V4 . No VERIFY the Body Control Module (BCM) fuse 46 (10A) or BJB fuse 29 (20A) is OK. If not OK, REPAIR the circuit in question. | ||||||||||||||||||||||||||||||||||||||||||||
| V4 CHECK THE HVAC MODULE GROUND CIRCUIT FOR AN OPEN | |||||||||||||||||||||||||||||||||||||||||||||

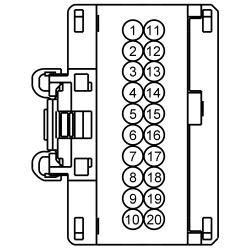 | Yes
GO to V5 . No REPAIR the circuit in question. | ||||||||||||||||||||||||||||||||||||||||||||
| V5 CHECK FOR CORRECT HVAC MODULE OPERATION | |||||||||||||||||||||||||||||||||||||||||||||
| Yes
CHECK OASIS for any applicable TSBs. If a TSB exists for this concern, discontinue this test and follow TSB instructions. If no TSBs address this concern, INSTALL a new HVAC module. REFER to Section 412-01 . No The system is operating correctly at this time. The concern may have been caused by a loose or corroded connector. ADDRESS the root cause of any connector or pin issues. | ||||||||||||||||||||||||||||||||||||||||||||
Pinpoint Test W: The Audio Digital Signal Processing (DSP) Module Does Not Respond To The Scan Tool
Diagnostics in this manual assume a certain skill level and knowledge of Ford-specific diagnostic practices. Refer to Diagnostic Methods in Section 100-00 for information about these practices.
Refer to Wiring Diagrams Cell 14 , Module Communications Network for schematic and connector information.
Refer to Wiring Diagrams Cell 130 , Audio System/Navigation for schematic and connector information.
The audio Digital Signal Processing (DSP) module communicates with the scan tool through the High Speed Controller Area Network (HS-CAN). The IPC is used as a gateway module.
Verify BCM fuse 5 (20A) is OK.
NOTE: Failure to disconnect the battery when instructed will result in false resistance readings. Refer to Section 414-01 .
| Test Step | Result / Action to Take | ||||||||||||||||
|---|---|---|---|---|---|---|---|---|---|---|---|---|---|---|---|---|---|
| W1 CHECK THE AUDIO DSP MODULE VOLTAGE SUPPLY CIRCUITS FOR AN OPEN | |||||||||||||||||
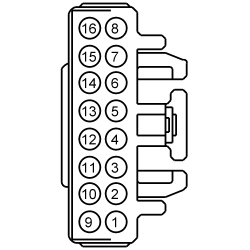 | Yes
GO to W2 . No VERIFY the Body Control Module (BCM) fuse 5 (20A) is OK. If OK, REPAIR the circuit in question. If not OK, REFER to the Wiring Diagrams manual to identify the possible causes of the circuit short. | ||||||||||||||||
| W2 CHECK THE AUDIO DSP MODULE GROUND CIRCUITS FOR AN OPEN | |||||||||||||||||
 | Yes
GO to W3 . No REPAIR the circuit in question. | ||||||||||||||||
| W3 CHECK THE I-CAN CIRCUITS BETWEEN THE AUDIO DSP MODULE AND THE DLC FOR AN OPEN | |||||||||||||||||
 | Yes
GO to W4 . No REPAIR the circuit in question. | ||||||||||||||||
| W4 CHECK FOR CORRECT AUDIO DSP MODULE OPERATION | |||||||||||||||||
| Yes
CHECK OASIS for any applicable TSBs. If a TSB exists for this concern, discontinue this test and follow TSB instructions. If no TSBs address this concern, INSTALL a new audio DSP module. REFER to Section 415-00C . No The system is operating correctly at this time. The concern may have been caused by a loose or corroded connector. ADDRESS the root cause of any connector or pin issues. | ||||||||||||||||
Pinpoint Test X: The Driver Door Module (DDM) Does Not Respond To The Scan Tool
Diagnostics in this manual assume a certain skill level and knowledge of Ford-specific diagnostic practices. Refer to Diagnostic Methods in Section 100-00 for information about these practices.
Refer to Wiring Diagrams Cell 14 , Module Communications Network for schematic and connector information.
Refer to Wiring Diagrams Cell 124 , Power Mirrors for schematic and connector information.
The Driver Door Module (DDM) communicates with the scan tool through the Medium Speed Controller Area Network (MS-CAN).
Verify BCM fuse 7 (7.5A) is OK.
NOTE: Failure to disconnect the battery when instructed will result in false resistance readings. Refer to Section 414-01 .
| Test Step | Result / Action to Take | ||||||||||||||||
|---|---|---|---|---|---|---|---|---|---|---|---|---|---|---|---|---|---|
| X1 CHECK THE DDM VOLTAGE SUPPLY CIRCUIT FOR AN OPEN | |||||||||||||||||
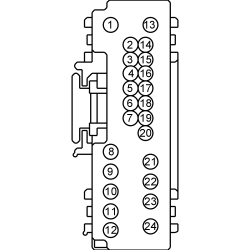 | Yes
GO to X2 . No VERIFY the Body Control Module (BCM) fuse 7 (7.5A) is OK. If OK, REPAIR the circuit. If not OK, REFER to the Wiring Diagrams manual to identify the possible causes of the circuit short. | ||||||||||||||||
| X2 CHECK THE DDM GROUND CIRCUIT FOR AN OPEN | |||||||||||||||||
 | Yes
GO to X3 . No REPAIR the circuit in question. | ||||||||||||||||
| X3 CHECK THE MS-CAN CIRCUITS BETWEEN THE DDM AND THE DLC FOR AN OPEN | |||||||||||||||||
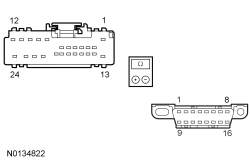 | Yes
GO to X4 . No REPAIR the circuit in question. | ||||||||||||||||
| X4 CHECK FOR CORRECT DDM OPERATION | |||||||||||||||||
| Yes
CHECK OASIS for any applicable TSBs. If a TSB exists for this concern, discontinue this test and follow TSB instructions. If no TSBs address this concern, INSTALL a new DDM . REFER to Section 501-14A (without IA ) or Section 501-14B (with IA ). No The system is operating correctly at this time. The concern may have been caused by a loose or corroded connector. ADDRESS the root cause of any connector or pin issues. | ||||||||||||||||
Pinpoint Test Y: The Dual Climate Controlled Seat Module (DCSM) Does Not Respond To The Scan Tool
Diagnostics in this manual assume a certain skill level and knowledge of Ford-specific diagnostic practices. Refer to Diagnostic Methods in Section 100-00 for information about these practices.
Refer to Wiring Diagrams Cell 14 , Module Communications Network for schematic and connector information.
Refer to Wiring Diagrams Cell 119 , Climate Controlled Seats for schematic and connector information.
The Dual Climate Controlled Seat Module (DCSM) communicates with the scan tool through the Medium Speed Controller Area Network (MS-CAN).
Verify BJB fuse 28 (30A) is OK.
NOTE: If a seat equipped with a Supplemental Restraint System (SRS) component is being serviced, the SRS must be depowered. Refer to Section 501-20B .
NOTE: Failure to disconnect the battery when instructed will result in false resistance readings. Refer to Section 414-01 .
| Test Step | Result / Action to Take | ||||||||||||||||
|---|---|---|---|---|---|---|---|---|---|---|---|---|---|---|---|---|---|
| Y1 CHECK THE DCSM VOLTAGE SUPPLY CIRCUITS FOR AN OPEN | |||||||||||||||||
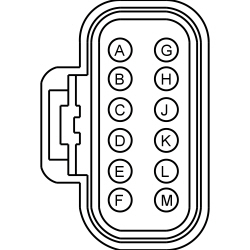 | Yes
GO to Y2 . No VERIFY the Battery Junction Box (BJB) fuse 28 (30A) is OK. If OK, REPAIR the circuit in question. If not OK, REFER to the Wiring Diagrams manual to identify the possible causes of the circuit short. | ||||||||||||||||
| Y2 CHECK THE DCSM GROUND CIRCUIT FOR AN OPEN | |||||||||||||||||
 | Yes
GO to Y3 . No REPAIR the circuit in question. | ||||||||||||||||
| Y3 CHECK THE MS-CAN CIRCUITS BETWEEN THE DCSM AND THE DLC FOR AN OPEN | |||||||||||||||||
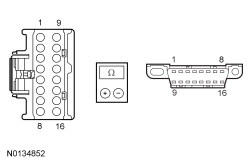 | Yes
GO to Y4 . No REPAIR the circuit in question. | ||||||||||||||||
| Y4 CHECK FOR CORRECT DCSM OPERATION | |||||||||||||||||
| Yes
CHECK OASIS for any applicable TSBs. If a TSB exists for this concern, discontinue this test and follow TSB instructions. If no TSBs address this concern, INSTALL a new DCSM . REFER to Section 501-10 . No The system is operating correctly at this time. The concern may have been caused by a loose or corroded connector. ADDRESS the root cause of any connector or pin issues. | ||||||||||||||||
Pinpoint Test Z: No High Speed Controller Area Network (HS-CAN) Communication, All Modules Are Not Responding
Diagnostics in this manual assume a certain skill level and knowledge of Ford-specific diagnostic practices. Refer to Diagnostic Methods in Section 100-00 for information about these practices.
Refer to Wiring Diagrams Cell 14 , Module Communications Network for schematic and connector information.
Refer to Communications Network .
NOTE: Various modules set network DTCs during this test procedure. Clear DTCs from all modules after completing the diagnostic procedure.
NOTE: Failure to disconnect the battery when instructed results in false resistance readings. Refer to Section 414-01 .
| Test Step | Result / Action to Take | ||||||||||||||||||||||||||||||||
|---|---|---|---|---|---|---|---|---|---|---|---|---|---|---|---|---|---|---|---|---|---|---|---|---|---|---|---|---|---|---|---|---|---|
| Z1 CHECK THE DLC PINS FOR DAMAGE | |||||||||||||||||||||||||||||||||
 | Yes
GO to Z2 . No REPAIR the DLC as necessary. | ||||||||||||||||||||||||||||||||
| Z2 CHECK THE HS-CAN TERMINATION RESISTANCE | |||||||||||||||||||||||||||||||||
 | Yes
GO to Z3 . No GO to Z5 . | ||||||||||||||||||||||||||||||||
| Z3 CHECK THE HS-CAN (+) AND HS-CAN (-) CIRCUITS FOR A SHORT TO GROUND | |||||||||||||||||||||||||||||||||
 | Yes
GO to Z4 . No GO to Z12 . | ||||||||||||||||||||||||||||||||
| Z4 CHECK THE HS-CAN (+) AND HS-CAN (-) CIRCUITS FOR A SHORT TO VOLTAGE | |||||||||||||||||||||||||||||||||
 | Yes
REPAIR the circuit in question. No GO to Z13 . | ||||||||||||||||||||||||||||||||
| Z5 CHECK THE HS-CAN TERMINATION RESISTOR | |||||||||||||||||||||||||||||||||
 | Yes
GO to Z6 . No GO to Z9 . | ||||||||||||||||||||||||||||||||
| Z6 CHECK THE HS-CAN TERMINATION RESISTOR WITH THE PCM DISCONNECTED | |||||||||||||||||||||||||||||||||
 | Yes
GO to Z7 . No GO to Z8 . | ||||||||||||||||||||||||||||||||
| Z7 CHECK THE HS-CAN CIRCUITS BETWEEN THE PCM AND THE DLC FOR AN OPEN | |||||||||||||||||||||||||||||||||

 | Yes
GO to Z33 . No REPAIR the circuit in question. | ||||||||||||||||||||||||||||||||
| Z8 CHECK THE HS-CAN CIRCUITS BETWEEN THE BCM AND THE DLC FOR AN OPEN | |||||||||||||||||||||||||||||||||
 | Yes
GO to Z27 . No REPAIR the circuit in question. | ||||||||||||||||||||||||||||||||
| Z9 CHECK THE HS-CAN (+) AND HS-CAN (-) CIRCUITS FOR A SHORT TOGETHER | |||||||||||||||||||||||||||||||||
 | Yes
GO to Z11 . No GO to Z10 . | ||||||||||||||||||||||||||||||||
| Z10 CHECK THE HS-CAN (+) AND HS-CAN (-) CIRCUITS FOR AN OPEN | |||||||||||||||||||||||||||||||||
 | Yes
REPAIR the DLC or REPAIR the circuit in question. No A capacitor internal to a module may still be draining, causing irregular resistance readings. WAIT 5 minutes. REPEAT the pinpoint test. | ||||||||||||||||||||||||||||||||
| Z11 CHECK THE HS-CAN (+) AND HS-CAN (-) CIRCUITS FOR A SHORT TOGETHER | |||||||||||||||||||||||||||||||||
 | Yes
For the APIM , GO to Z23 . For the ABS module, GO to Z24 . For the BCM , GO to Z25 . For the C-CM , GO to Z26 . For the HUD module, GO to Z27 . For the IPC , GO to Z28 . For the OCSM , GO to Z29 . For the PAM , GO to Z30 . For the PCM, GO to Z31 . For the RCM , GO to Z32 . For the SCCM , GO to Z33 . For the PSCM , GO to Z34 . No REPAIR the circuits. | ||||||||||||||||||||||||||||||||
| Z12 CHECK THE HS-CAN (+) AND HS-CAN (-) CIRCUITS FOR A SHORT TO GROUND WITH THE MODULES DISCONNECTED | |||||||||||||||||||||||||||||||||
 | Yes
For the APIM , GO to Z23 . For the ABS module, GO to Z24 . For the BCM , GO to Z25 . For the C-CM , GO to Z26 . For the HUD module, GO to Z27 . For the IPC , GO to Z28 . For the OCSM , GO to Z29 . For the PAM , GO to Z30 . For the PCM, GO to Z31 . For the RCM , GO to Z32 . For the SCCM , GO to Z33 . For the PSCM , GO to Z34 . No REPAIR the circuit in question. CONNECT all modules. | ||||||||||||||||||||||||||||||||
| Z13 CHECK FOR RESTORED COMMUNICATION WITH THE PCM DISABLED | |||||||||||||||||||||||||||||||||
NOTE: Establish an Integrated Diagnostic System (IDS) session prior to disabling the PCM in this test step. If the PCM has failed communication during multiple attempts to identify the vehicle, first identify the vehicle manually by entering a PCM part number, calibration number or tear tag when prompted by IDS . NOTE: When a vehicle is manually identified by a PCM part number, calibration number or tear tag, the IDS does not automatically run a network test. Manually select and run the Network Test. NOTE: When re-running the network test, close the Network Test application first or the screen display reverts back to the prior run Network Test results. | Yes
INSTALL the removed fuses. GO to Pinpoint Test A . No INSTALL the removed fuses. GO to Z14 . | ||||||||||||||||||||||||||||||||
| Z14 CHECK FOR RESTORED NETWORK COMMUNICATION WITH THE ABS MODULE DISABLED | |||||||||||||||||||||||||||||||||
NOTE: When re-running the network test, close the Network Test application first or the screen display reverts back to the prior run Network Test results. | Yes
INSTALL the removed fuses. GO to Pinpoint Test B . No INSTALL the removed fuses. GO to Z15 . | ||||||||||||||||||||||||||||||||
| Z15 CHECK FOR RESTORED NETWORK COMMUNICATION WITH THE IPC , AND THE HUD MODULE DISABLED | |||||||||||||||||||||||||||||||||
NOTE: When re-running the network test, close the Network Test application first or the screen display reverts back to the prior run Network Test results. | Yes
INSTALL the removed fuses. If the vehicle is not equipped with Head Up Display (HUD) module, GO to Pinpoint Test D . If the vehicle is equipped with Head Up Display (HUD) module, GO to Z16 . No INSTALL the removed fuses. If the vehicle is equipped with a C-CM , GO to Z17 . If the vehicle is not equipped with a C-CM , GO to Z18 . | ||||||||||||||||||||||||||||||||
| Z16 CHECK FOR RESTORED COMMUNICATION WITH THE IPC AND THE HUD MODULE DISCONNECTED | |||||||||||||||||||||||||||||||||
NOTE: When re-running the network test, close the Network Test application first or the screen display reverts back to the prior run Network Test results. | Yes
CONNECT all modules. For restored operation with the IPC disconnected, GO to Pinpoint Test D . For restored operation with the HUD module disconnected, GO to Pinpoint Test H . No CONNECT all modules. The HS-CAN tests within specification. VERIFY the correct operation of the scan tool on a known good vehicle. | ||||||||||||||||||||||||||||||||
| Z17 CHECK FOR RESTORED NETWORK COMMUNICATION WITH THE C-CM DISABLED | |||||||||||||||||||||||||||||||||
NOTE: When re-running the network test, close the Network Test application first or the screen display reverts back to the prior run Network Test results. | Yes
INSTALL the removed fuses. GO to Pinpoint Test J . No GO to Z18 . | ||||||||||||||||||||||||||||||||
| Z18 CHECK FOR RESTORED NETWORK COMMUNICATION WITH THE RCM , OCSM , PAM , AND THE APIM DISABLED | |||||||||||||||||||||||||||||||||
NOTE: When re-running the network test, close the Network Test application first or the screen display reverts back to the prior run Network Test results. | Yes
INSTALL the removed fuses. GO to Z19 . No INSTALL the removed fuses. GO to Z20 . | ||||||||||||||||||||||||||||||||
| Z19 CHECK FOR RESTORED COMMUNICATION WITH THE RCM , OCSM , PAM , AND APIM DISCONNECTED | |||||||||||||||||||||||||||||||||
NOTE: When re-running the network test, close the Network Test application first or the screen display reverts back to the prior run Network Test results. | Yes
CONNECT all modules. For restored operation with the RCM disconnected, GO to Pinpoint Test F . For restored operation with the OCSM disconnected, GO to Pinpoint Test G . For restored operation with the PAM disconnected, GO to Pinpoint Test K . For restored operation with the APIM disconnected, GO to Pinpoint Test M . No CONNECT all modules. The HS-CAN tests within specification. VERIFY the correct operation of the scan tool on a known good vehicle. | ||||||||||||||||||||||||||||||||
| Z20 CHECK FOR RESTORED NETWORK COMMUNICATION WITH THE BCM DISABLED | |||||||||||||||||||||||||||||||||
NOTE: When re-running the network test, close the Network Test application first or the screen display reverts back to the prior run Network Test results. | Yes
INSTALL the removed fuse. GO to Pinpoint Test C . No INSTALL the removed fuse. GO to Z21 . | ||||||||||||||||||||||||||||||||
| Z21 CHECK FOR RESTORED NETWORK COMMUNICATION WITH THE SCCM DISABLED | |||||||||||||||||||||||||||||||||
NOTE: When re-running the network test, close the Network Test application first or the screen display reverts back to the prior run Network Test results. | Yes
INSTALL the removed fuses. GO to Pinpoint Test I . No INSTALL the removed fuses. GO to Z22 . | ||||||||||||||||||||||||||||||||
| Z22 CHECK FOR RESTORED NETWORK COMMUNICATION WITH THE PSCM DISABLED | |||||||||||||||||||||||||||||||||
NOTE: When re-running the network test, close the Network Test application first or the screen display reverts back to the prior run Network Test results. | Yes
INSTALL the removed fuse. GO to Pinpoint Test E . No INSTALL the removed fuse. The HS-CAN tests within specification. VERIFY the correct operation of the scan tool on a known good vehicle. | ||||||||||||||||||||||||||||||||
| Z23 CHECK THE APIM FOR CORRECT OPERATION | |||||||||||||||||||||||||||||||||
| Yes
CHECK OASIS for any applicable TSBs. If a TSB exists for this concern, DISCONTINUE this test and FOLLOW TSB instructions. If no TSBs address this concern, For diagnosing and testing please refer to the on-line Workshop Manual. If you do not have an on-line subscription, go to www.motorcraftservice.com. No The system is operating correctly at this time. The concern may have been caused by a loose or corroded connector. ADDRESS the root cause of any connector or pin issues. | ||||||||||||||||||||||||||||||||
| Z24 CHECK THE ABS MODULE FOR CORRECT OPERATION | |||||||||||||||||||||||||||||||||
| Yes
CHECK OASIS for any applicable TSBs. If a TSB exists for this concern, DISCONTINUE this test and FOLLOW TSB instructions. If no TSBs address this concern, INSTALL a new ABS module. REFER to Section 206-09 . No The system is operating correctly at this time. The concern may have been caused by a loose or corroded connector. ADDRESS the root cause of any connector or pin issues. | ||||||||||||||||||||||||||||||||
| Z25 CHECK THE BCM FOR CORRECT OPERATION | |||||||||||||||||||||||||||||||||
| Yes
CHECK OASIS for any applicable TSBs. If a TSB exists for this concern, DISCONTINUE this test and FOLLOW TSB instructions. If no TSBs address this concern, INSTALL a new BCM . REFER to Section 419-10 . No The system is operating correctly at this time. The concern may have been caused by a loose or corroded connector. ADDRESS the root cause of any connector or pin issues. | ||||||||||||||||||||||||||||||||
| Z26 CHECK THE C-CM FOR CORRECT OPERATION | |||||||||||||||||||||||||||||||||
| Yes
CHECK OASIS for any applicable TSBs. If a TSB exists for this concern, DISCONTINUE this test and FOLLOW TSB instructions. If no TSBs address this concern, INSTALL a new C-CM . REFER to Section 419-03B . No The system is operating correctly at this time. The concern may have been caused by a loose or corroded connector. ADDRESS the root cause of any connector or pin issues. | ||||||||||||||||||||||||||||||||
| Z27 CHECK THE HUD MODULE FOR CORRECT OPERATION | |||||||||||||||||||||||||||||||||
| Yes
CHECK OASIS for any applicable TSBs. If a TSB exists for this concern, DISCONTINUE this test and FOLLOW TSB instructions. If no TSBs address this concern, INSTALL a new HUD module. REFER to Section 419-03C . No The system is operating correctly at this time. The concern may have been caused by a loose or corroded connector. ADDRESS the root cause of any connector or pin issues. | ||||||||||||||||||||||||||||||||
| Z28 CHECK THE IPC FOR CORRECT OPERATION | |||||||||||||||||||||||||||||||||
| Yes
CHECK OASIS for any applicable TSBs. If a TSB exists for this concern, DISCONTINUE this test and FOLLOW TSB instructions. If no TSBs address this concern, INSTALL a new IPC . REFER to Section 413-01 . No The system is operating correctly at this time. The concern may have been caused by a loose or corroded connector. ADDRESS the root cause of any connector or pin issues. | ||||||||||||||||||||||||||||||||
| Z29 CHECK THE OCSM FOR CORRECT OPERATION | |||||||||||||||||||||||||||||||||
| Yes
CHECK OASIS for any applicable TSBs. If a TSB exists for this concern, DISCONTINUE this test and FOLLOW TSB instructions. If no TSBs address this concern, INSTALL a new OCSM . REFER to Section 501-20B . No The system is operating correctly at this time. The concern may have been caused by a loose or corroded connector. ADDRESS the root cause of any connector or pin issues. | ||||||||||||||||||||||||||||||||
| Z30 CHECK THE PAM FOR CORRECT OPERATION | |||||||||||||||||||||||||||||||||
| Yes
CHECK OASIS for any applicable TSBs. If a TSB exists for this concern, DISCONTINUE this test and FOLLOW TSB instructions. If no TSBs address this concern, INSTALL a new PAM . REFER to Section 413-13A . No The system is operating correctly at this time. The concern may have been caused by a loose or corroded connector. ADDRESS the root cause of any connector or pin issues. | ||||||||||||||||||||||||||||||||
| Z31 CHECK THE PCM FOR CORRECT OPERATION | |||||||||||||||||||||||||||||||||
| Yes
CHECK OASIS for any applicable TSBs. If a TSB exists for this concern, DISCONTINUE this test and FOLLOW TSB instructions. If no TSBs address this concern, INSTALL a new PCM. REFER to Section 303-14 . No The system is operating correctly at this time. The concern may have been caused by a loose or corroded connector. ADDRESS the root cause of any connector or pin issues. | ||||||||||||||||||||||||||||||||
| Z32 CHECK THE RCM FOR CORRECT OPERATION | |||||||||||||||||||||||||||||||||
| Yes
CHECK OASIS for any applicable TSBs. If a TSB exists for this concern, DISCONTINUE this test and FOLLOW TSB instructions. If no TSBs address this concern, INSTALL a new RCM . REFER to Section 501-20B . No The system is operating correctly at this time. The concern may have been caused by a loose or corroded connector. ADDRESS the root cause of any connector or pin issues. | ||||||||||||||||||||||||||||||||
| Z33 CHECK THE SCCM FOR CORRECT OPERATION | |||||||||||||||||||||||||||||||||
| Yes
CHECK OASIS for any applicable TSBs. If a TSB exists for this concern, DISCONTINUE this test and FOLLOW TSB instructions. If no TSBs address this concern, INSTALL a new SCCM . REFER to Section 211-05 . No The system is operating correctly at this time. The concern may have been caused by a loose or corroded connector. ADDRESS the root cause of any connector or pin issues. | ||||||||||||||||||||||||||||||||
| Z34 CHECK THE PSCM FOR CORRECT OPERATION | |||||||||||||||||||||||||||||||||
| Yes
CHECK OASIS for any applicable TSBs. If a TSB exists for this concern, DISCONTINUE this test and FOLLOW TSB instructions. If no TSBs address this concern, INSTALL a new PSCM . REFER to Section 211-04 . No The system is operating correctly at this time. The concern may have been caused by a loose or corroded connector. ADDRESS the root cause of any connector or pin issues. | ||||||||||||||||||||||||||||||||
Pinpoint Test AA: No Medium Speed Controller Area Network (MS-CAN) Communication, All Modules Are Not Responding
Diagnostics in this manual assume a certain skill level and knowledge of Ford-specific diagnostic practices. Refer to Diagnostic Methods in Section 100-00 for information about these practices.
Refer to Wiring Diagrams Cell 14 , Module Communications Network for schematic and connector information.
Refer to Communications Network .
NOTE: Various modules set network DTCs during this test procedure. Clear DTCs from all modules after completing the diagnostic procedure.
NOTE: Failure to disconnect the battery when instructed results in false resistance readings. Refer to Section 414-01 .
| Test Step | Result / Action to Take | ||||||||||||||||||||||||||||||||
|---|---|---|---|---|---|---|---|---|---|---|---|---|---|---|---|---|---|---|---|---|---|---|---|---|---|---|---|---|---|---|---|---|---|
| AA1 CHECK THE DLC PINS FOR DAMAGE | |||||||||||||||||||||||||||||||||
 | Yes
GO to AA2 . No REPAIR the DLC as necessary. | ||||||||||||||||||||||||||||||||
| AA2 CHECK THE MS-CAN TERMINATION RESISTANCE | |||||||||||||||||||||||||||||||||
 | Yes
GO to AA3 . No GO to AA5 . | ||||||||||||||||||||||||||||||||
| AA3 CHECK THE MS-CAN (+) AND MS-CAN (-) CIRCUITS FOR A SHORT TO GROUND | |||||||||||||||||||||||||||||||||
 | Yes
GO to AA4 . No GO to AA12 . | ||||||||||||||||||||||||||||||||
| AA4 CHECK THE MS-CAN (+) AND MS-CAN (-) CIRCUITS FOR A SHORT TO VOLTAGE | |||||||||||||||||||||||||||||||||
 | Yes
REPAIR the circuit in question. No GO to AA13 . | ||||||||||||||||||||||||||||||||
| AA5 CHECK THE MS-CAN TERMINATION RESISTOR | |||||||||||||||||||||||||||||||||
 | Yes
GO to AA6 . No GO to AA9 . | ||||||||||||||||||||||||||||||||
| AA6 CHECK THE MS-CAN TERMINATION RESISTOR WITH THE BCM DISCONNECTED | |||||||||||||||||||||||||||||||||
 | Yes
GO to AA7 . No GO to AA8 . | ||||||||||||||||||||||||||||||||
| AA7 CHECK THE MS-CAN CIRCUITS BETWEEN THE BCM AND THE DLC FOR AN OPEN | |||||||||||||||||||||||||||||||||
 | Yes
GO to AA21 . No REPAIR the circuit in question. | ||||||||||||||||||||||||||||||||
| AA8 CHECK THE MS-CAN CIRCUITS BETWEEN THE HVAC MODULE AND THE DLC FOR AN OPEN | |||||||||||||||||||||||||||||||||
 | Yes
GO to AA26 . No REPAIR the circuit in question. | ||||||||||||||||||||||||||||||||
| AA9 CHECK THE MS-CAN (+) AND MS-CAN (-) CIRCUITS FOR A SHORT TOGETHER | |||||||||||||||||||||||||||||||||
 | Yes
GO to AA11 . No GO to AA10 . | ||||||||||||||||||||||||||||||||
| AA10 CHECK THE MS-CAN (+) AND MS-CAN (-) CIRCUITS FOR AN OPEN | |||||||||||||||||||||||||||||||||
 | Yes
REPAIR the DLC or REPAIR the circuit in question. No A capacitor internal to a module may still be draining, causing irregular resistance readings. WAIT 5 minutes. REPEAT the pinpoint test. | ||||||||||||||||||||||||||||||||
| AA11 CHECK THE MS-CAN (+) AND MS-CAN (-) CIRCUITS FOR A SHORT TOGETHER | |||||||||||||||||||||||||||||||||
 | Yes
For the APIM , GO to AA21 . For the BCM , GO to AA22 . For the DDM , GO to AA23 . For the DSM , GO to AA24 . For the DCSM , GO to AA25 . For the GPSM , GO to AA26 . For the HVAC module, GO to AA27 . For the RFA module, GO to AA28 . For the SOD-L , GO to AA29 . For the SOD-R , GO to AA30 . For the TPM module, GO to AA31 . No REPAIR circuits for a short together. CONNECT all modules. | ||||||||||||||||||||||||||||||||
| AA12 CHECK THE MS-CAN (+) AND MS-CAN (-) CIRCUITS FOR A SHORT TO GROUND WITH THE MODULES DISCONNECTED | |||||||||||||||||||||||||||||||||
 | Yes
For the APIM , GO to AA21 . For the BCM , GO to AA22 . For the DDM , GO to AA23 . For the DSM , GO to AA24 . For the DCSM , GO to AA25 . For the GPSM , GO to AA26 . For the HVAC module, GO to AA27 . For the RFA module, GO to AA28 . For the SOD-L , GO to AA29 . For the SOD-R , GO to AA30 . For the TPM module, GO to AA31 . No REPAIR the circuit in question. | ||||||||||||||||||||||||||||||||
| AA13 CHECK FOR RESTORED COMMUNICATION WITH THE BCM , GPSM , AND THE APIM DISABLED | |||||||||||||||||||||||||||||||||
NOTE: When re-running the network test, close the Network Test application first or the screen display reverts back to the prior run Network Test results. | Yes
INSTALL the removed fuses. If the vehicle is not equipped with a GPSM module (8-inch touchscreen), GO to Pinpoint Test C . If the vehicle is equipped with a GPSM (8-inch touchscreen), GO to AA14 . No INSTALL the removed fuses. GO to AA15 . | ||||||||||||||||||||||||||||||||
| AA14 CHECK FOR RESTORED COMMUNICATION WITH THE GPSM AND THE APIM DISCONNECTED | |||||||||||||||||||||||||||||||||
NOTE: When re-running the network test, close the Network Test application first or the screen display reverts back to the prior run Network Test results. | Yes
CONNECT all modules. For restored operation with the GPSM disconnected, GO to Pinpoint Test Q . For restored operation with the APIM disconnected, GO to Pinpoint Test M . No CONNECT all modules. GO to Pinpoint Test C . | ||||||||||||||||||||||||||||||||
| AA15 CHECK FOR RESTORED COMMUNICATION WITH THE DDM DISABLED | |||||||||||||||||||||||||||||||||
NOTE: When re-running the network test, close the Network Test application first or the screen display reverts back to the prior run Network Test results. | Yes
INSTALL removed fuse. GO to Pinpoint Test X . No INSTALL removed fuse. GO to AA16 . | ||||||||||||||||||||||||||||||||
| AA16 CHECK FOR RESTORED NETWORK COMMUNICATION WITH THE SOD-L , SOD-R AND THE HVAC MODULE DISABLED | |||||||||||||||||||||||||||||||||
NOTE: When re-running the network test, close the Network Test application first or the screen display reverts back to the prior run Network Test results. | Yes
INSTALL the removed fuses. If the vehicle is not equipped with blind side monitor, GO to Pinpoint Test V . If the vehicle is equipped with blind side monitor, GO to AA17 . No INSTALL the removed fuses. GO to AA18 . | ||||||||||||||||||||||||||||||||
| AA17 CHECK FOR RESTORED COMMUNICATION WITH THE SOD-L , SOD-R AND THE HVAC MODULE DISCONNECTED | |||||||||||||||||||||||||||||||||
NOTE: When re-running the network test, close the Network Test application first or the screen display reverts back to the prior run Network Test results. | Yes
CONNECT all modules. For restored operation with the SOD-L disconnected, GO to Pinpoint Test S . For restored operation with the SOD-R disconnected, GO to Pinpoint Test T . For restored operation with the HVAC module disconnected, GO to Pinpoint Test V . No CONNECT all modules. The MS-CAN tests within specification. VERIFY the correct operation of the scan tool on a known good vehicle. | ||||||||||||||||||||||||||||||||
| AA18 CHECK FOR RESTORED NETWORK COMMUNICATION WITH THE DSM , DCSM AND THE TPM MODULE DISABLED | |||||||||||||||||||||||||||||||||
NOTE: When re-running the network test, close the Network Test application first or the screen display reverts back to the prior run Network Test results. | Yes
INSTALL the removed fuses. If the vehicle is not equipped with dual heated or memory seats, GO to Pinpoint Test R . If the vehicle is equipped with dual heated or memory seats, GO to AA19 . No INSTALL the removed fuses. If the vehicle is equipped with RFA module, GO to AA20 . If the vehicle is not equipped with RFA module, the MS-CAN tests within specification. VERIFY the correct operation of the scan tool on a known good vehicle. | ||||||||||||||||||||||||||||||||
| AA19 CHECK FOR RESTORED COMMUNICATION WITH THE DSM , DCSM AND THE TPM MODULE DISCONNECTED | |||||||||||||||||||||||||||||||||
NOTE: When re-running the network test, close the Network Test application first or the screen display reverts back to the prior run Network Test results. | Yes
CONNECT all modules. For restored operation with the DSM disconnected, GO to Pinpoint Test U . For restored operation with the DCSM disconnected, GO to Pinpoint Test Y . For restored operation with the TPM module disconnected, GO to Pinpoint Test R . No CONNECT all modules. The MS-CAN tests within specification. VERIFY the correct operation of the scan tool on a known good vehicle. | ||||||||||||||||||||||||||||||||
| AA20 CHECK FOR RESTORED NETWORK COMMUNICATION WITH THE RFA MODULE DISABLED | |||||||||||||||||||||||||||||||||
NOTE: When re-running the network test, close the Network Test application first or the screen display reverts back to the prior run Network Test results. | Yes
INSTALL the removed fuses. GO to Pinpoint Test L . No INSTALL the removed fuses. The MS-CAN tests within specification. VERIFY the correct operation of the scan tool on a known good vehicle. | ||||||||||||||||||||||||||||||||
| AA21 CHECK THE APIM FOR CORRECT OPERATION | |||||||||||||||||||||||||||||||||
| Yes
CHECK OASIS for any applicable TSBs. If a TSB exists for this concern, DISCONTINUE this test and FOLLOW TSB instructions. If no TSBs address this concern, For diagnosing and testing please refer to the on-line Workshop Manual. If you do not have an on-line subscription, go to www.motorcraftservice.com. No The system is operating correctly at this time. The concern may have been caused by a loose or corroded connector. ADDRESS the root cause of any connector or pin issues. | ||||||||||||||||||||||||||||||||
| AA22 CHECK THE BCM FOR CORRECT OPERATION | |||||||||||||||||||||||||||||||||
| Yes
CHECK OASIS for any applicable TSBs. If a TSB exists for this concern, DISCONTINUE this test and FOLLOW TSB instructions. If no TSBs address this concern, INSTALL a new BCM . REFER to Section 419-10 . No The system is operating correctly at this time. The concern may have been caused by a loose or corroded connector. ADDRESS the root cause of any connector or pin issues. | ||||||||||||||||||||||||||||||||
| AA23 CHECK THE DDM FOR CORRECT OPERATION | |||||||||||||||||||||||||||||||||
| Yes
CHECK OASIS for any applicable TSBs. If a TSB exists for this concern, DISCONTINUE this test and FOLLOW TSB instructions. If no TSBs address this concern, INSTALL a new DDM . REFER to Section 501-14A (without IA ) or Section 501-14B (with IA ). No The system is operating correctly at this time. The concern may have been caused by a loose or corroded connector. ADDRESS the root cause of any connector or pin issues. | ||||||||||||||||||||||||||||||||
| AA24 CHECK THE DSM FOR CORRECT OPERATION | |||||||||||||||||||||||||||||||||
| Yes
CHECK OASIS for any applicable TSBs. If a TSB exists for this concern, DISCONTINUE this test and FOLLOW TSB instructions. If no TSBs address this concern, INSTALL a new DSM . REFER to Section 501-10 . No The system is operating correctly at this time. The concern may have been caused by a loose or corroded connector. ADDRESS the root cause of any connector or pin issues. | ||||||||||||||||||||||||||||||||
| AA25 CHECK THE DCSM FOR CORRECT OPERATION | |||||||||||||||||||||||||||||||||
| Yes
CHECK OASIS for any applicable TSBs. If a TSB exists for this concern, DISCONTINUE this test and FOLLOW TSB instructions. If no TSBs address this concern, INSTALL a new DCSM . REFER to Section 501-10 . No The system is operating correctly at this time. The concern may have been caused by a loose or corroded connector. ADDRESS the root cause of any connector or pin issues. | ||||||||||||||||||||||||||||||||
| AA26 CHECK THE GPSM FOR CORRECT OPERATION | |||||||||||||||||||||||||||||||||
| Yes
CHECK OASIS for any applicable TSBs. If a TSB exists for this concern, DISCONTINUE this test and FOLLOW TSB instructions. If no TSBs address this concern, INSTALL a new GPSM . Refer to the appropriate section in Group 415 for the procedure. No The system is operating correctly at this time. The concern may have been caused by a loose or corroded connector. ADDRESS the root cause of any connector or pin issues. | ||||||||||||||||||||||||||||||||
| AA27 CHECK THE HVAC MODULE FOR CORRECT OPERATION | |||||||||||||||||||||||||||||||||
| Yes
CHECK OASIS for any applicable TSBs. If a TSB exists for this concern, DISCONTINUE this test and FOLLOW TSB instructions. If no TSBs address this concern, INSTALL a new HVAC module. REFER to Section 412-01 . No The system is operating correctly at this time. The concern may have been caused by a loose or corroded connector. ADDRESS the root cause of any connector or pin issues. | ||||||||||||||||||||||||||||||||
| AA28 CHECK THE RFA MODULE FOR CORRECT OPERATION | |||||||||||||||||||||||||||||||||
| Yes
CHECK OASIS for any applicable TSBs. If a TSB exists for this concern, DISCONTINUE this test and FOLLOW TSB instructions. If no TSBs address this concern, INSTALL a new RFA module. REFER to Section 419-10 . No The system is operating correctly at this time. The concern may have been caused by a loose or corroded connector. ADDRESS the root cause of any connector or pin issues. | ||||||||||||||||||||||||||||||||
| AA29 CHECK THE SOD-L FOR CORRECT OPERATION | |||||||||||||||||||||||||||||||||
| Yes
CHECK OASIS for any applicable TSBs. If a TSB exists for this concern, DISCONTINUE this test and FOLLOW TSB instructions. If no TSBs address this concern, INSTALL a new SOD-L . REFER to Section 419-04 . No The system is operating correctly at this time. The concern may have been caused by a loose or corroded connector. ADDRESS the root cause of any connector or pin issues. | ||||||||||||||||||||||||||||||||
| AA30 CHECK THE SOD-R FOR CORRECT OPERATION | |||||||||||||||||||||||||||||||||
| Yes
CHECK OASIS for any applicable TSBs. If a TSB exists for this concern, DISCONTINUE this test and FOLLOW TSB instructions. If no TSBs address this concern, INSTALL a new SOD-R . REFER to Section 419-04 . No The system is operating correctly at this time. The concern may have been caused by a loose or corroded connector. ADDRESS the root cause of any connector or pin issues. | ||||||||||||||||||||||||||||||||
| AA31 CHECK THE TPM MODULE FOR CORRECT OPERATION | |||||||||||||||||||||||||||||||||
| Yes
CHECK OASIS for any applicable TSBs. If a TSB exists for this concern, DISCONTINUE this test and FOLLOW TSB instructions. If no TSBs address this concern, INSTALL a new TPM module. REFER to Section 204-04 . No The system is operating correctly at this time. The concern may have been caused by a loose or corroded connector. ADDRESS the root cause of any connector or pin issues. | ||||||||||||||||||||||||||||||||
Pinpoint Test AB: No Infotainment Controller Area Network (I-CAN) Communication, All Modules Are Not Responding
Diagnostics in this manual assume a certain skill level and knowledge of Ford-specific diagnostic practices. Refer to Diagnostic Methods in Section 100-00 for information about these practices.
Refer to Wiring Diagrams Cell 14 , Module Communications Network for schematic and connector information.
Refer to Communications Network .
NOTE: Various modules set network DTCs during this test procedure. Clear DTCs from all modules after completing the diagnostic procedure.
NOTE: Failure to disconnect the battery when instructed results in false resistance readings. Refer to Section 414-01 .
| Test Step | Result / Action to Take | ||||||||||||||||
|---|---|---|---|---|---|---|---|---|---|---|---|---|---|---|---|---|---|
| AB1 CHECK THE I-CAN TERMINATION RESISTANCE | |||||||||||||||||
 | Yes
GO to AB2 . No GO to AB4 . | ||||||||||||||||
| AB2 CHECK THE I-CAN (+) AND I-CAN (-) CIRCUITS FOR A SHORT TO GROUND | |||||||||||||||||
 | Yes
GO to AB3 . No GO to AB11 . | ||||||||||||||||
| AB3 CHECK THE I-CAN (+) AND I-CAN (-) CIRCUITS FOR A SHORT TO VOLTAGE | |||||||||||||||||
 | Yes
REPAIR the circuit in question. No GO to AB12 . | ||||||||||||||||
| AB4 CHECK THE I-CAN TERMINATION RESISTOR | |||||||||||||||||
 | Yes
GO to AB5 . No GO to AB8 . | ||||||||||||||||
| AB5 CHECK THE I-CAN TERMINATION RESISTOR WITH THE IPC DISCONNECTED | |||||||||||||||||
 | Yes
GO to AB6 . No GO to AB7 . | ||||||||||||||||
| AB6 CHECK THE I-CAN CIRCUITS BETWEEN THE IPC AND THE DLC FOR AN OPEN | |||||||||||||||||
 | Yes
GO to AB22 . No REPAIR the circuit in question. | ||||||||||||||||
| AB7 CHECK THE I-CAN CIRCUITS BETWEEN THE ACM AND THE DLC FOR AN OPEN | |||||||||||||||||
 | Yes
GO to AB19 . No REPAIR the circuit in question. | ||||||||||||||||
| AB8 CHECK THE I-CAN (+) AND I-CAN (-) CIRCUITS FOR A SHORT TOGETHER | |||||||||||||||||
 | Yes
GO to AB10 . No GO to AB9 . | ||||||||||||||||
| AB9 CHECK THE I-CAN CIRCUITS BETWEEN THE IPC AND THE DLC FOR AN OPEN | |||||||||||||||||
 | Yes
REPAIR the DLC or REPAIR the circuit in question. No A capacitor internal to a module may still be draining, causing irregular resistance readings. WAIT 5 minutes. REPEAT the pinpoint test. | ||||||||||||||||
| AB10 CHECK THE I-CAN (+) AND I-CAN (-) CIRCUITS FOR A SHORT TOGETHER WITH THE MODULES DISCONNECTED | |||||||||||||||||
 | Yes
For the APIM , GO to AB17 . For the audio DSP module, GO to AB18 . For the ACM , GO to AB19 . For the FCIM , GO to AB20 . For the FCDIM , GO to AB21 . For the IPC , GO to AB22 . No REPAIR the circuit in question. CONNECT all modules. | ||||||||||||||||
| AB11 CHECK THE I-CAN (+) AND I-CAN (-) CIRCUITS FOR A SHORT TO GROUND WITH THE MODULES DISCONNECTED | |||||||||||||||||
 | Yes
For the APIM , GO to AB17 . For the audio DSP module, GO to AB18 . For the ACM , GO to AB19 . For the FCIM , GO to AB20 . For the FCDIM , GO to AB21 . For the IPC , GO to AB22 . No REPAIR the circuit in question. CONNECT all modules. | ||||||||||||||||
| AB12 CHECK FOR RESTORED COMMUNICATION WITH THE FCIM AND THE FCDIM DISABLED | |||||||||||||||||
NOTE: When re-running the network test, close the Network Test application first or the screen display reverts back to the prior run Network Test results. | Yes
INSTALL the removed fuse. For vehicles equipped with a FCDIM , GO to AB13 . For vehicles not equipped with a FCDIM , GO to Pinpoint Test O . No INSTALL the removed fuse. GO to AB14 . | ||||||||||||||||
| AB13 CHECK FOR RESTORED COMMUNICATION WITH THE FCDIM DISCONNECTED | |||||||||||||||||
NOTE: When re-running the network test, close the Network Test application first or the screen display reverts back to the prior run Network Test results. | Yes
CONNECT all modules. For restored operation with the FCDIM disconnected, GO to Pinpoint Test P . No CONNECT all modules. GO to AB14 . | ||||||||||||||||
| AB14 CHECK FOR RESTORED NETWORK COMMUNICATION WITH THE AUDIO DSP MODULE DISABLED | |||||||||||||||||
NOTE: When re-running the network test, close the Network Test application first or the screen display reverts back to the prior run Network Test results. | Yes
INSTALL the removed fuse. GO to Pinpoint Test W . No INSTALL the removed fuse. GO to AB15 . | ||||||||||||||||
| AB15 CHECK FOR RESTORED COMMUNICATION WITH THE APIM AND THE ACM DISABLED | |||||||||||||||||
NOTE: When re-running the network test, close the Network Test application first or the screen display reverts back to the prior run Network Test results. | Yes
INSTALL the removed fuse. For restored operation with the APIM disabled, GO to AB16 . For vehicles not equipped with an APIM , GO to Pinpoint Test N . No INSTALL the removed fuse. The I-CAN tests within specification. VERIFY the correct operation of the scan tool on a known good vehicle. | ||||||||||||||||
| AB16 CHECK FOR RESTORED COMMUNICATION WITH THE APIM DISCONNECTED | |||||||||||||||||
NOTE: When re-running the network test, close the Network Test application first or the screen display reverts back to the prior run Network Test results. | Yes
CONNECT all modules. For restored operation with the APIM disconnected, GO to Pinpoint Test M . No CONNECT all modules. GO to Pinpoint Test N . | ||||||||||||||||
| AB17 CHECK THE APIM FOR CORRECT OPERATION | |||||||||||||||||
| Yes
CHECK OASIS for any applicable TSBs. If a TSB exists for this concern, DISCONTINUE this test and FOLLOW TSB instructions. If no TSBs address this concern, For diagnosing and testing please refer to the on-line Workshop Manual. If you do not have an on-line subscription, go to www.motorcraftservice.com. No The system is operating correctly at this time. The concern may have been caused by a loose or corroded connector. ADDRESS the root cause of any connector or pin issues. | ||||||||||||||||
| AB18 CHECK THE AUDIO DSP MODULE FOR CORRECT OPERATION | |||||||||||||||||
| Yes
CHECK OASIS for any applicable TSBs. If a TSB exists for this concern, DISCONTINUE this test and FOLLOW TSB instructions. If no TSBs address this concern, INSTALL a new audio DSP module. REFER to Section 415-00C . No The system is operating correctly at this time. The concern may have been caused by a loose or corroded connector. ADDRESS the root cause of any connector or pin issues. | ||||||||||||||||
| AB19 CHECK THE ACM FOR CORRECT OPERATION | |||||||||||||||||
| Yes
CHECK OASIS for any applicable TSBs. If a TSB exists for this concern, DISCONTINUE this test and FOLLOW TSB instructions. If no TSBs address this concern, INSTALL a new ACM . Refer to the appropriate section in Group 415 for the procedure. No The system is operating correctly at this time. The concern may have been caused by a loose or corroded connector. ADDRESS the root cause of any connector or pin issues. | ||||||||||||||||
| AB20 CHECK THE FCIM FOR CORRECT OPERATION | |||||||||||||||||
| Yes
CHECK OASIS for any applicable TSBs. If a TSB exists for this concern, DISCONTINUE this test and FOLLOW TSB instructions. If no TSBs address this concern, INSTALL a new FCIM . Refer to the appropriate section in Group 415 for the procedure. No The system is operating correctly at this time. The concern may have been caused by a loose or corroded connector. ADDRESS the root cause of any connector or pin issues. | ||||||||||||||||
| AB21 CHECK THE FCDIM FOR CORRECT OPERATION | |||||||||||||||||
| Yes
CHECK OASIS for any applicable TSBs. If a TSB exists for this concern, DISCONTINUE this test and FOLLOW TSB instructions. If no TSBs address this concern, INSTALL a new FCDIM . Refer to the appropriate section in Group 415 for the procedure. No The system is operating correctly at this time. The concern may have been caused by a loose or corroded connector. ADDRESS the root cause of any connector or pin issues. | ||||||||||||||||
| AB22 CHECK THE IPC FOR CORRECT OPERATION | |||||||||||||||||
| Yes
CHECK OASIS for any applicable TSBs. If a TSB exists for this concern, DISCONTINUE this test and FOLLOW TSB instructions. If no TSBs address this concern, INSTALL a new IPC . REFER to Section 413-01 . No The system is operating correctly at this time. The concern may have been caused by a loose or corroded connector. ADDRESS the root cause of any connector or pin issues. | ||||||||||||||||
Pinpoint Test AC: No Power To The Scan Tool
Diagnostics in this manual assume a certain skill level and knowledge of Ford-specific diagnostic practices. Refer to Diagnostic Methods in Section 100-00 for information about these practices.
Refer to Wiring Diagrams Cell 14 , Module Communications Network for schematic and connector information.
The scan tool is connected to the Data Link Connector (DLC) to communicate with modules on the High Speed Controller Area Network (HS-CAN) and the Medium Speed Controller Area Network (MS-CAN).
A loss of ground or poor ground at the DLC may result in HS-CAN , MS-CAN or I-CAN faults while the scan tool is connected.
NOTE: Failure to disconnect the battery when instructed will result in false resistance readings. Refer to Section 414-01 .
| Test Step | Result / Action to Take | ||||||||||||||||
|---|---|---|---|---|---|---|---|---|---|---|---|---|---|---|---|---|---|
| AC1 CHECK DLC PINS FOR DAMAGE | |||||||||||||||||
 | Yes
GO to AC2 . No REPAIR the DLC as necessary. | ||||||||||||||||
| AC2 CHECK THE VOLTAGE SUPPLY CIRCUIT TO THE DLC | |||||||||||||||||
 | Yes
GO to AC3 . No VERIFY the Body Control Module (BCM) fuse 24 (15A) is OK. If OK, REPAIR the circuit. If not OK, REFER to the Wiring Diagrams Manual to identify the possible causes of the circuit short. | ||||||||||||||||
| AC3 CHECK THE DLC GROUND CIRCUITS FOR AN OPEN | |||||||||||||||||
 | Yes
CONNECT the negative battery cable. REPAIR the scan tool. No REPAIR the circuit in question. CONNECT the negative battery cable. | ||||||||||||||||